Whether your computer is old or new, you need it to deliver optimum performance to enjoy your work, gaming or media streaming experience.
There are many reasons why the device may feel sluggish, but you can make it run faster. Whatever your reason may be for wanting to speed things up, we share some tweaks to speed up Windows 10 and get the most out of your device.


Contents
- 1 How to Tweak Windows 10 to Improve Your Computer’s Performance
- 1.0.1 1. Check for and Install Windows Updates
- 1.0.2 2. Open Only the Apps You Need
- 1.0.3 3. Use ReadyBoost
- 1.0.4 4. Enable Automatic Page File Management
- 1.0.5 5. Free Up Space on Your Computer
- 1.0.6 6. Adjust Visual Effects in Windows 10 for Best Performance
- 1.0.7 7. Pause OneDrive Syncing Temporarily
- 1.0.8 8. Disable Startup Programs
- 1.0.9 9. Scan Your Computer for Viruses and Malware
- 1.0.10 10. Switch to a New Power Plan
- 1.0.11 11. Disable Search Indexing
- 1.0.12 12. Perform System Restore
- 1.0.13 13. Factory Reset Your Computer
- 2 Boost Your Computer’s Performance
How to Tweak Windows 10 to Improve Your Computer’s Performance
Windows 10 works fast on modern hardware, but over time, the operating system may start degrading due to viruses, bugs, compatibility issues, hardware problems and more. There are several things you can do to speed up and speed up Windows 10 on your computer when it gets slower instead of replacing it altogether.
Here are some simple hardware and software tweaks that can significantly speed up, optimize and improve Windows 10 no matter the configuration.
1. Check for and Install Windows Updates
To get the most out of your computer, you need to install the latest version of Windows 10. As you check for Windows updates, your PC also searches for the latest device drivers, which translates to better performance.
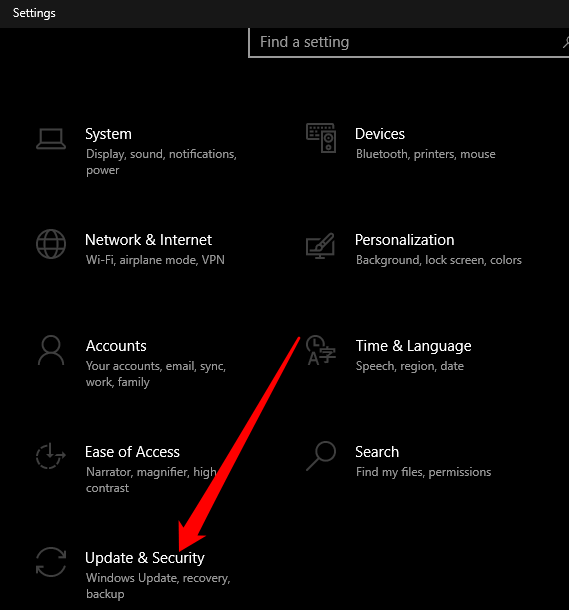
- To check for and install Windows Updates in Windows 10, select Start > Settings > Update & Security.
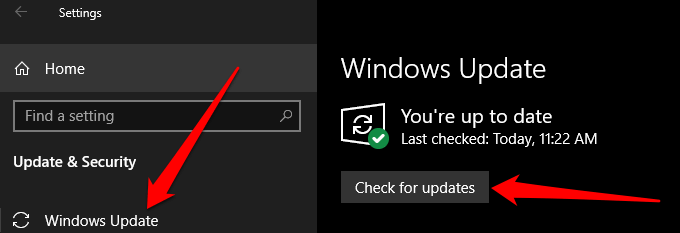
- Select Windows Updates on the left pane and then select Check for updates.
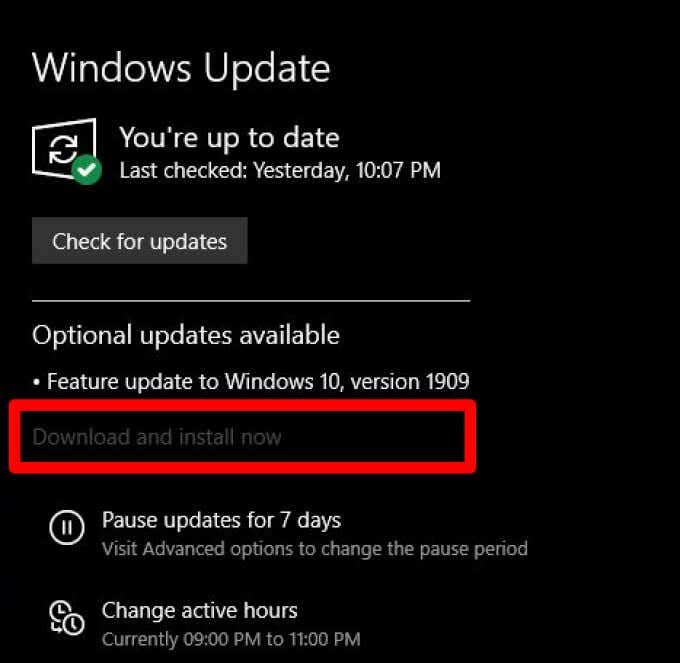
- Check if there are any updates available or pending updates, and then select Install now to install them.
Reboot your computer and check if it runs better after installing Windows Updates.
2. Open Only the Apps You Need
Too many apps, browsers and tabs or programs open at the same time can slow down your computer and reduce its performance. This is because each app eats up RAM, CPU and GPU performance, disk space and system resources.

To resolve this and speed up Windows 10, close any apps that you don’t need as well as any browser tabs or programs that aren’t in use and see if your computer performs better.
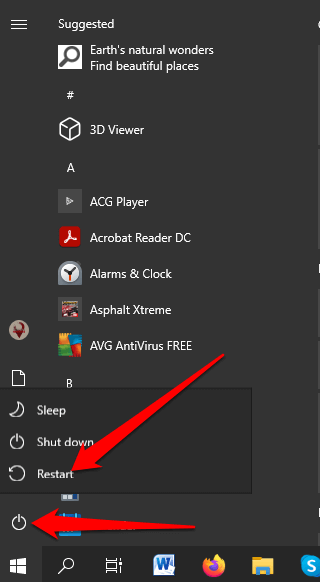
If not, select Start > Power > Restart to restart your computer, and then open only the browser tabs, windows, programs and apps you need.
If you have apps designed to work with older Windows versions running in Windows 10, check whether the developer has an updated version or use the Program Compatibility Troubleshooter to see what apps are affecting your computer’s performance.
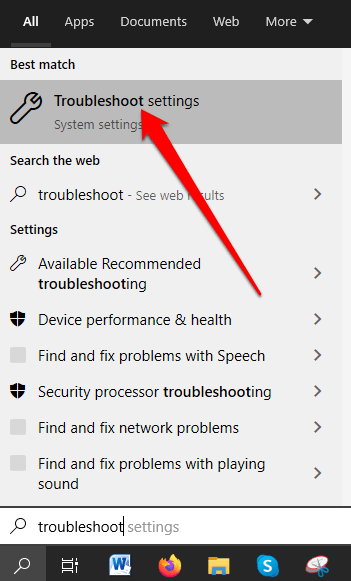
- To run the Program Compatibility Troubleshooter, type Troubleshoot in the search box and select Troubleshoot settings.
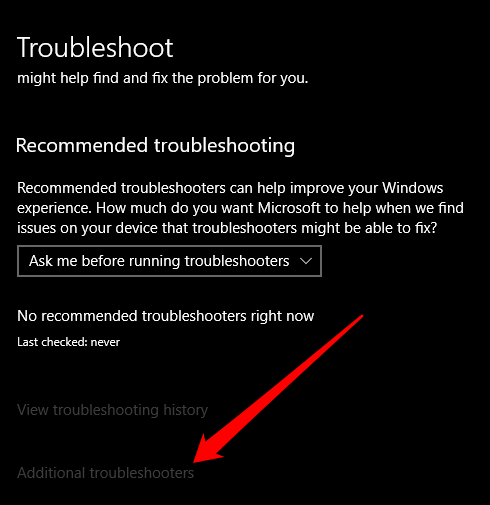
- Select Additional Troubleshooters.
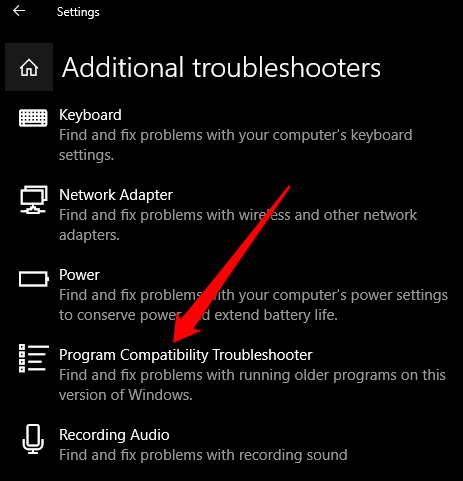
- Next, select Program Compatibility Troubleshooter > Run the troubleshooter and then select the app or program with issues. Select Next and continue with the troubleshooter.
3. Use ReadyBoost
ReadyBoost is a disk caching software by Microsoft, which was developed for Windows Vista. The software may be useful in limited circumstances and allows you to use a USB flash drive (500 MB) or other removable drive to help improve performance and without adding more RAM or opening your computer.
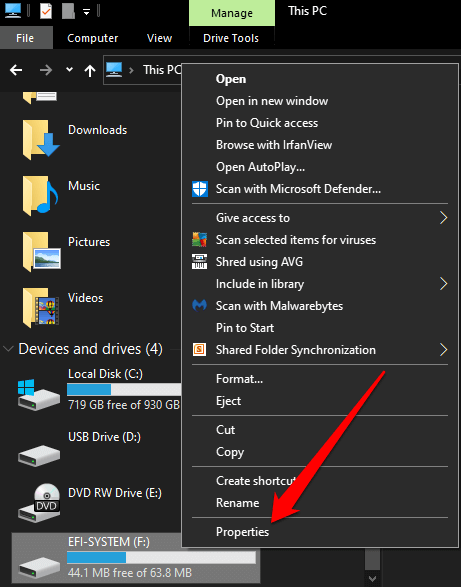
- To use ReadyBoost, insert your USB flash drive into your PC, select File Explorer, right-click the drive and select Properties.
- Select ReadyBoost > Use this device.
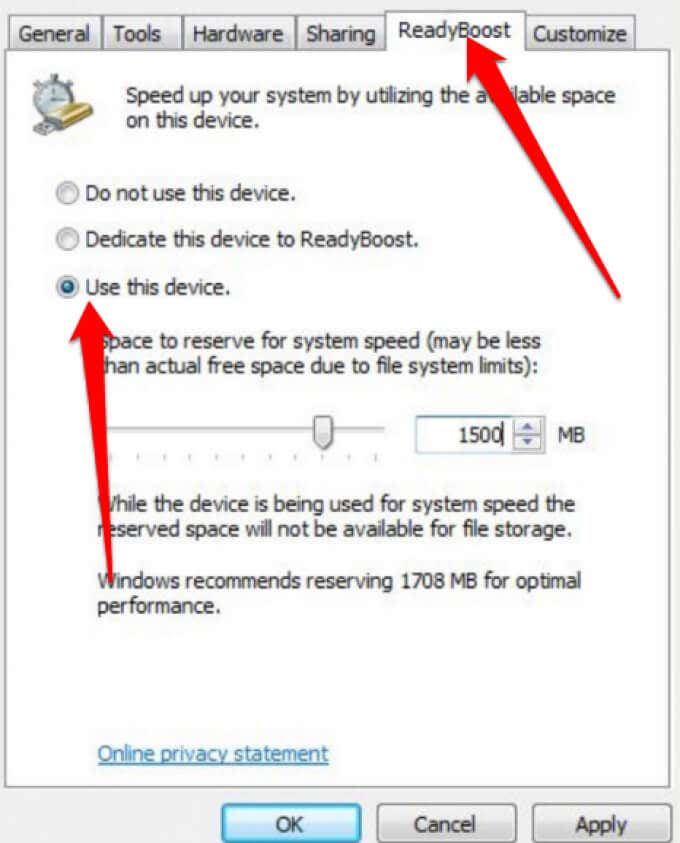
Note: Windows will notify you if your device cannot use ReadyBoost, and then determines the free space required to optimize memory and speed up Windows 10. However, ReadyBoost can’t work if you’ve installed Windows 10 on an SSD drive because the latter is already fast.
- Select OK to reserve the free space for ReadyBoost to use it.
4. Enable Automatic Page File Management
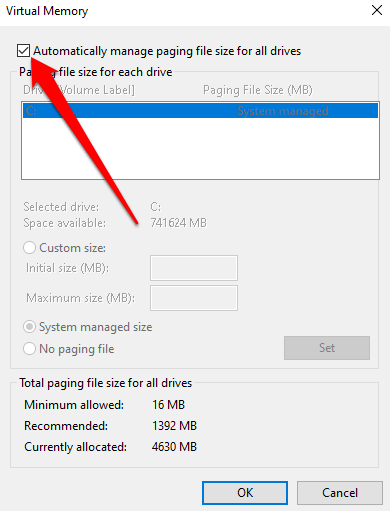
Automatic page file management ensures that the system can manage the page file size. Windows uses the paging file area on your hard disk like memory and manages it automatically for better performance.
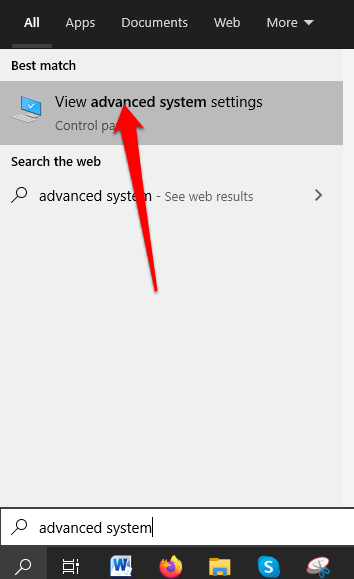
- To enable automatic page file management, type advanced system in the search bar and select View advanced system settings.
- Next, select Advanced tab in System Properties and then go to the Performance section and select Settings.
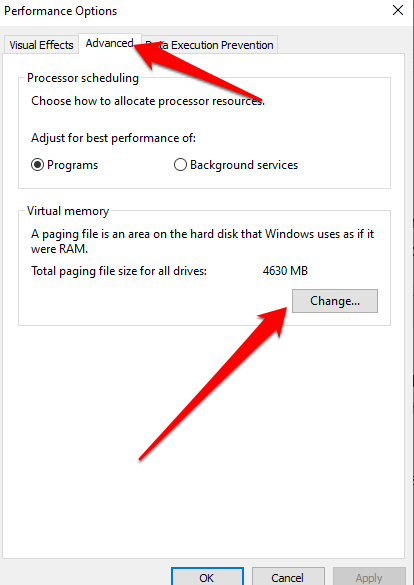
- Select Advanced tab in the Performance Options section and then go to Virtual Memory area and select Change.
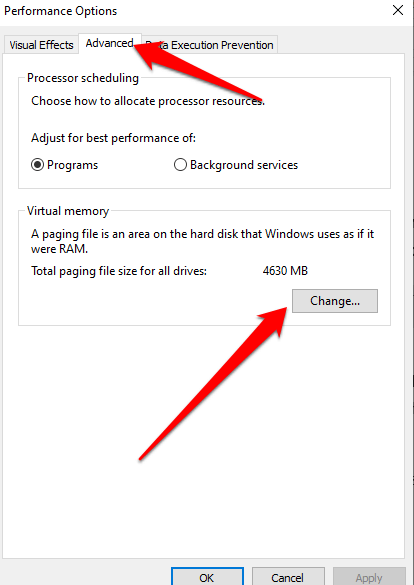
- Next, select the box next to Automatically manage paging file size for all drives, and then restart your computer.
5. Free Up Space on Your Computer
If there’s limited space on your startup drive, your computer will work harder at finding room to store your temporary files and apps.
Moreover, the system also reserves disk space for virtual memory so when the space gets tight, your computer’s performance will slow down while it tries to manage all the storage tasks.
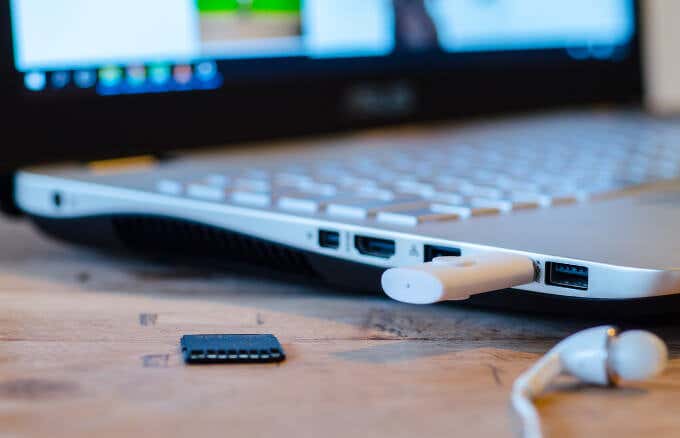
To ease the overhead, make sure your computer has about 10 to 15 percent of free space to avoid dramatic slowdown due to storage in Windows 10. You can use the built-in disk cleanup utility to free up some space or uninstall apps you no longer use or need.
To uninstall apps, select Start > Settings > Apps > Apps & features and then select Uninstall for each app you want to remove from your computer to free up some space. Alternatively, you can move some files to a different drive, cloud storage or save them to removable media like a USB drive or other external storage.
6. Adjust Visual Effects in Windows 10 for Best Performance
There are many visual effects in Windows 10 including shadow effects and animations, all of which look great, but hog system resources and slow down your computer.
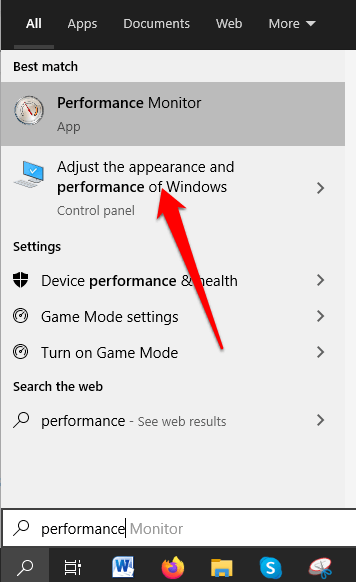
- To adjust visual effects in Windows 10, type performance in the search bar and then select Adjust the appearance and performance of Windows.
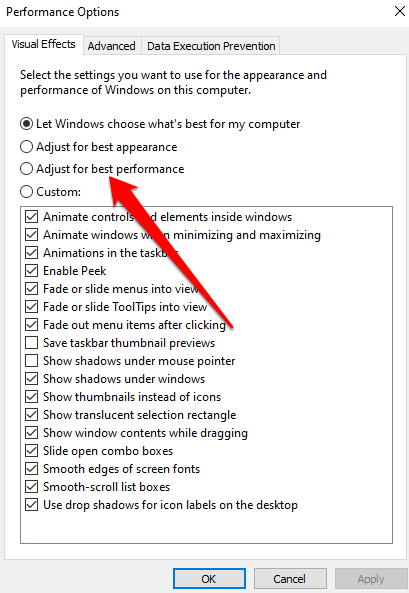
- Select Adjust for best performance on the Visual Effects tab and then select Apply.
- Reboot your computer and check whether the performance improves after adjusting the visual effects.
7. Pause OneDrive Syncing Temporarily
In Windows 10, you can choose where to save your files by default. For instance, you can choose to save them locally on your computer or to OneDrive and sync files. This way, you can access your files from any location or device provided you’re connected to the internet.
Saving to OneDrive also keeps backups of your files in case your computer is damaged or gets lost. However, syncing can slow down your computer, but you can pause syncing to OneDrive temporarily to speed up Windows 10.
- To do this, find OneDrive in the notification area and then select More > Pause syncing.
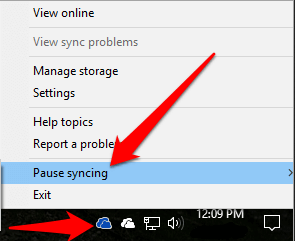
- Select how long you want to pause file syncing, restart your computer and check whether the performance improves. You can always resume OneDrive syncing by selecting OneDrive > More > Resume syncing.
8. Disable Startup Programs
When you power on your computer, you’ll notice that some programs start automatically and run in the background. Such programs slow down your computer, but you can disable them especially for programs you don’t use often as they increase the time Windows takes to start.
- To disable startup programs from starting automatically, select Start > Settings > Apps and then select Startup.
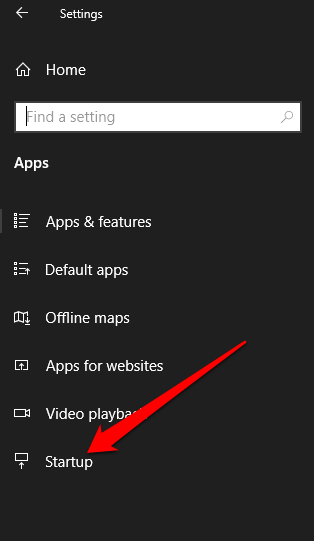
- Find the program you want to stop in the Startup Apps area and set it to Off.
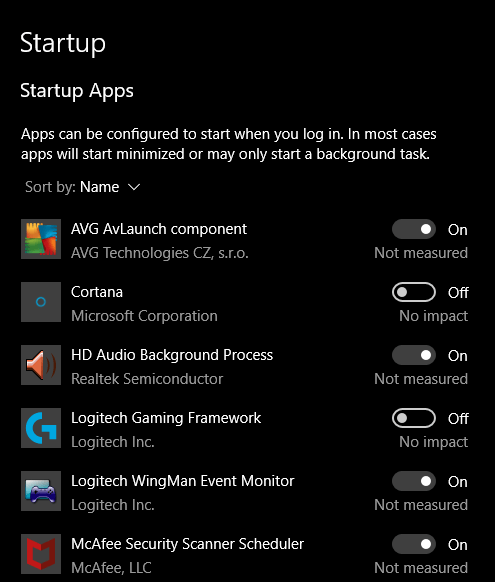
Note: If you turn off a startup program and it still starts automatically when you turn on your computer, run a virus and malware scan.
9. Scan Your Computer for Viruses and Malware
Viruses and malware are known to slow down your computer’s performance. When your computer is infected with viruses or malware, you may notice the sound of your hard disk constantly working, programs unexpectedly start automatically and there are unexpected popups.
Make sure you have the best antivirus that can nuke any virus or malware and keep it up to date. Run regular scans and make sure you don’t install multiple anti malware or antivirus software to avoid software conflicts that also affect your computer’s performance.
10. Switch to a New Power Plan
Windows 10 optimizes power usage through different power plans such as Power Saver, Balanced and High performance plans. The High Performance plan is ideal for better performance as it allows your computer to use more power and work faster.
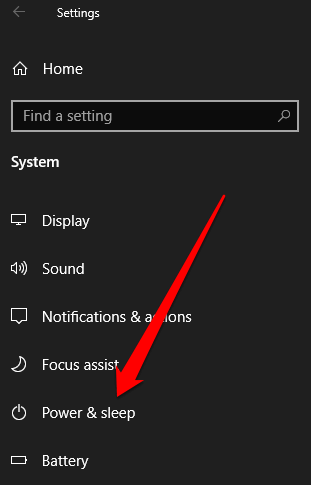
- To change the power plan, select Settings > System > Power & sleep.
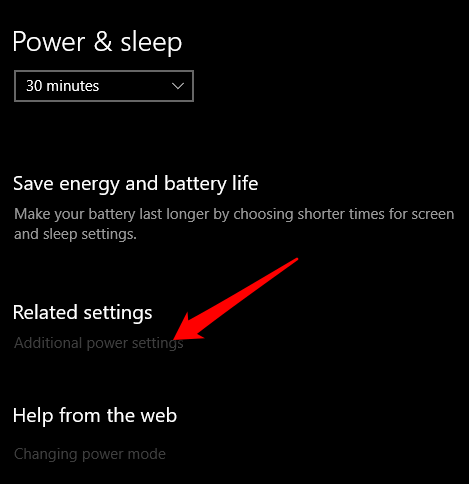
- Select Additional power settings under Related settings.
- Next, select Create a power plan and then select High performance power plan.
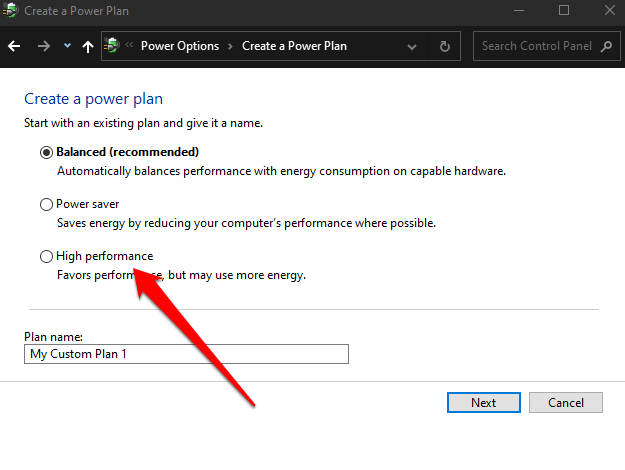
Note: If the High performance plan is unavailable, create a custom power plan or change the power mode by clicking the battery icon in the taskbar and select Best performance for better performance.
11. Disable Search Indexing
The Windows search indexing process may hog system resources and negatively impact your computer’s performance. You can disable the search index to improve system performance using these steps.
- Select Settings > Search > Searching Windows.
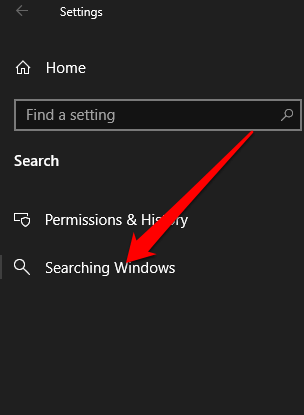
- Next, select Advanced Search Indexer settings under the More search indexer settings.
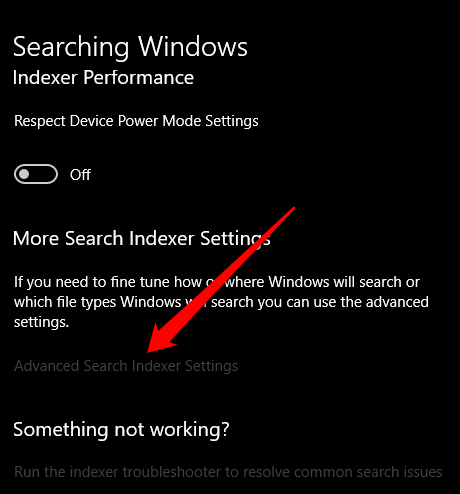
- Select Modify.
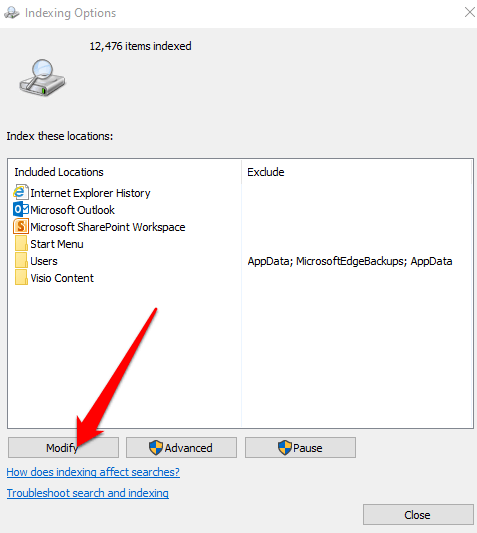
- Next, select Show all locations.
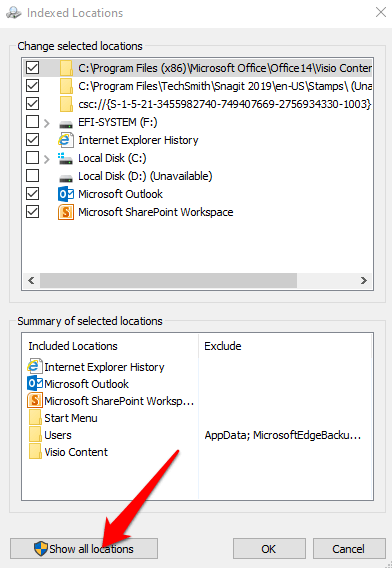
- Clear all the selected locations under the Change selected locations area and then select OK.
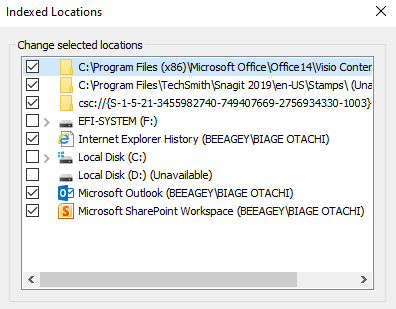
Windows will no longer index the specified locations and your computer’s performance will improve.
12. Perform System Restore
If you installed a new device driver, system update or app and your computer’s performance began to slow down, you can use a System Restore to return the device to a previous working state.
- To perform a System restore, search for Create a restore point and then select its result to open the System Properties application.
- Next, select System protection > System Restore and select Next.
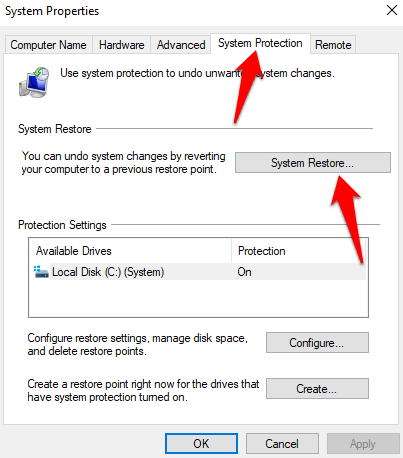
- Choose the most recent restore point and see if that helps resolve the sluggish performance issue.
- Select Scan for affected programs and then select Close > Next > Finish.
Note: A System restore removes system changes, drivers, updates and apps you installed after the restore point was created, but your files will be preserved.
13. Factory Reset Your Computer
If you’ve tried all the above solutions and your computer’s performance is still dismal, you can factory reset your computer as a last resort. Doing this will reinstall the operating system, give you a clean copy of Windows 10 to start from and boost your computer’s overall system performance, battery life, startup and shut down.
Boost Your Computer’s Performance
We hope you were able to see some significant improvements to your computer’s overall performance using any or all of these Windows 10 tweaks. If you have other tricks you use to speed up Windows 10, share them with us in the comments.

