Does your PC display a “Windows 11 installation has failed” error when you try upgrading to Windows 11? This error can be caused by outdated or corrupt graphics drivers, insufficient storage space, or interference from third-party software.
Your computer will also display this error if it doesn’t meet Windows 11 upgrade requirements. Before we highlight potential troubleshooting fixes for this error, let’s run you through Windows 11 software and hardware requirements.
Contents
- 1 Windows 11 Upgrade Requirements
- 2 How to Use the PC Health Check App
- 3 1. Unplug External Devices
- 4 2. Update Windows
- 5 3. Uninstall Third-Party Antivirus Software
- 6 4. Uninstall Old and Non-Essential Apps
- 7 5. Free Up Storage Space
- 8 6. Update Your Graphics Card Driver
- 9 7. Enable TPM 2.0 and Secure Boot
- 10 8. Troubleshoot or Clear Your PC’s TPM
- 11 9. Bypass TPM 2.0 and Secure Boot Checks
- 12 Get Professional Support
Windows 11 Upgrade Requirements
If you’re running Windows 10, use the PC Health Check to access your PC’s compatibility with Windows 11. The app checks all Windows 11 requirements except for graphics card and display compatibility. Here’s a brief rundown of important Windows 11 system requirements:
- Storage: at least 64GB of free space.
- RAM: at least 4GB RAM.
- Graphics card: DirectX 12 or later (with WDDM 2.0 driver).
- Trusted Platform Module (TPM): TPM version 2.0.
- Display: High Definition (720p).
- Firmware: UEFI with Secure Boot support.
- OS: Windows 10, version 2004
How to Use the PC Health Check App
Download and install the PC Health Check app from Microsoft’s website. Launch the app and select the Check now button on the dashboard.
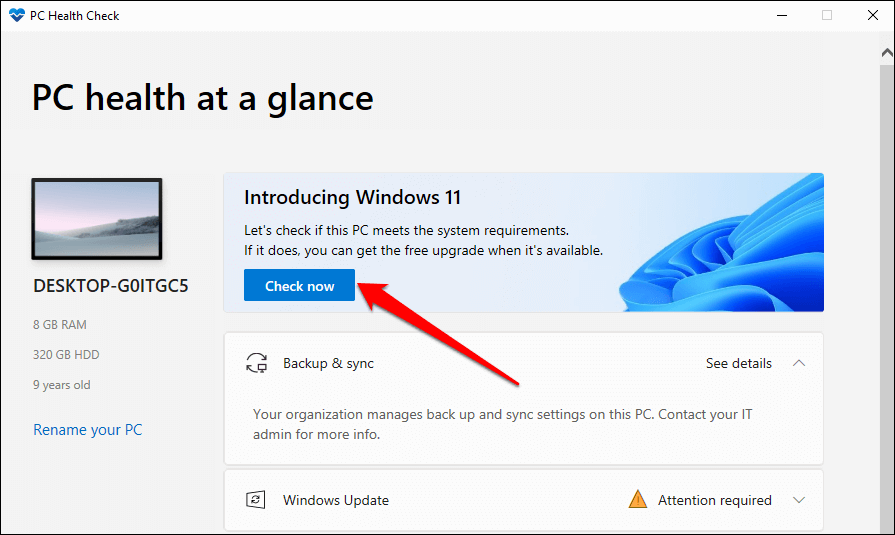
The PC Health Check app will run a quick scan to verify that your computer’s hardware and software configuration meets Windows 11 system requirements. If there are Windows 11 requirements your PC doesn’t satisfy, you’ll see them in the scan results.
Select See all results to view the requirements your PC meets.
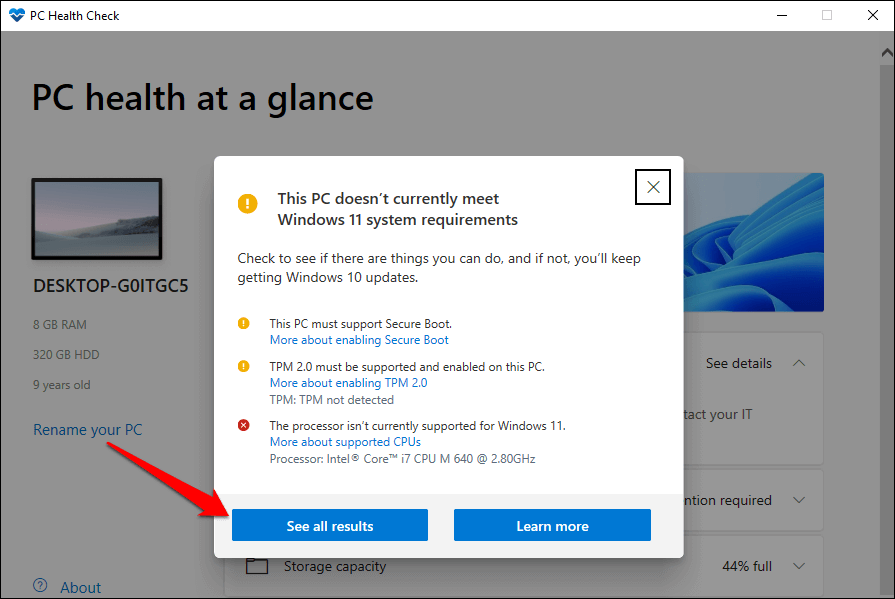
Running the PC Health Check scan can help narrow down troubleshooting areas when dealing with Windows 11 installation failures.
1. Unplug External Devices
Leaving USB drives connected to your PC can interrupt the Windows installation process. If any storage devices are connected to your computer, unplug them and try installing Windows 11 again.
2. Update Windows
Your computer must be running at least Windows 10, version 2004 to install a Windows 11 update. Microsoft recommends having all driver and security updates installed on your PC before upgrading to Windows 11.
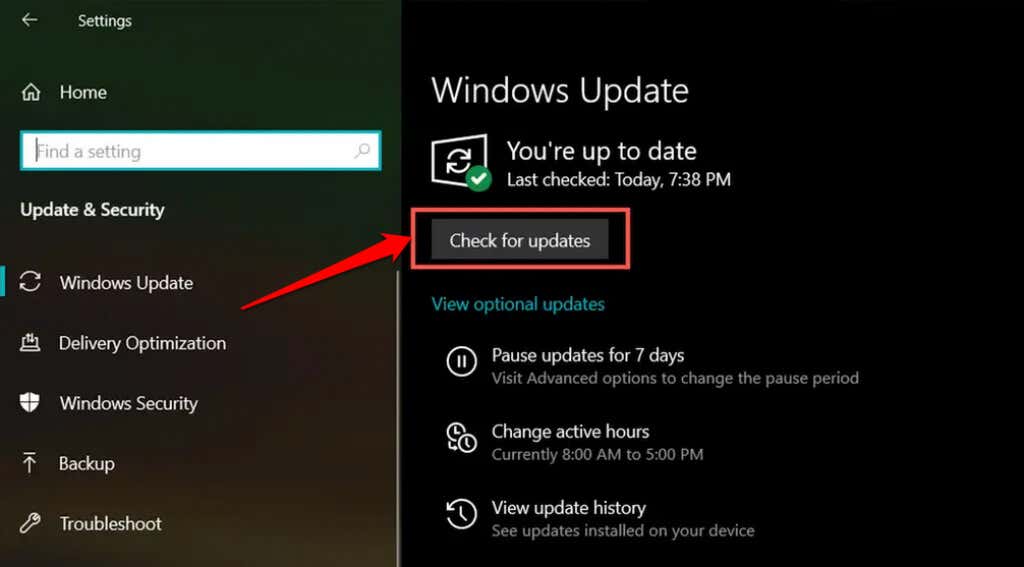
First, make sure your PC is connected to the internet. Go to Settings > Updates & Security > Windows Updates, and select Check for updates. Install any update available on the page, and then try installing Windows 11 again.
3. Uninstall Third-Party Antivirus Software
Some third-party antivirus apps have components that can interfere with Windows 11 installation. If you have any non-Windows antivirus tools on your PC, remove them and reattempt the Windows 11 installation or upgrade.
Refer to our article on uninstalling Avast, AVG, and other antivirus software in Windows 10.
4. Uninstall Old and Non-Essential Apps
Microsoft also warns that old or outdated software can interrupt the Windows 11 upgrade process.
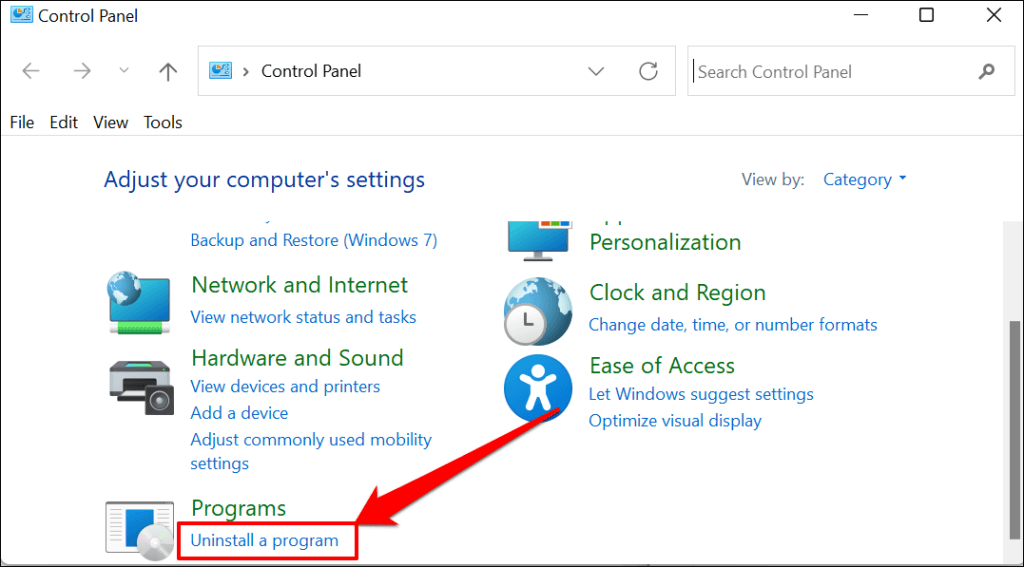
- Open the Windows Control Panel and select Uninstall a program in the
Programs” category.
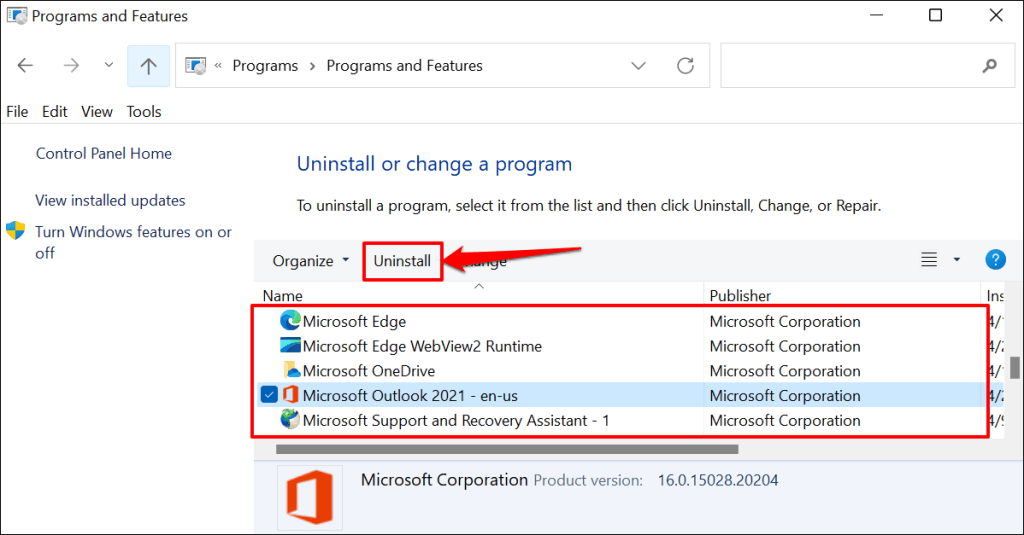
- Select the app(s) you no longer use and select Uninstall to remove it from your computer.
Restart your computer after removing non-essential apps and retry the Windows 11 upgrade.
5. Free Up Storage Space
Windows 11 requires at least 64 GB of storage (see–How Much Space Windows 11 Uses). The “Windows 11 installation has failed” installation error may pop up if your PC’s storage is less than required. We recommend having 70–90 GB of free storage, however, just to be on the safe side.
If your PC has less than 64 GB of storage, check out 15 ways to free up hard drive space in Windows 10. You’ll also find this tutorial on creating more hard disk space in Windows 10 helpful.
6. Update Your Graphics Card Driver
A corrupt or outdated graphics driver can also mess up Windows 11 installation. Update your PC’s graphics card driver to the latest version and re-attempt the Windows upgrade.
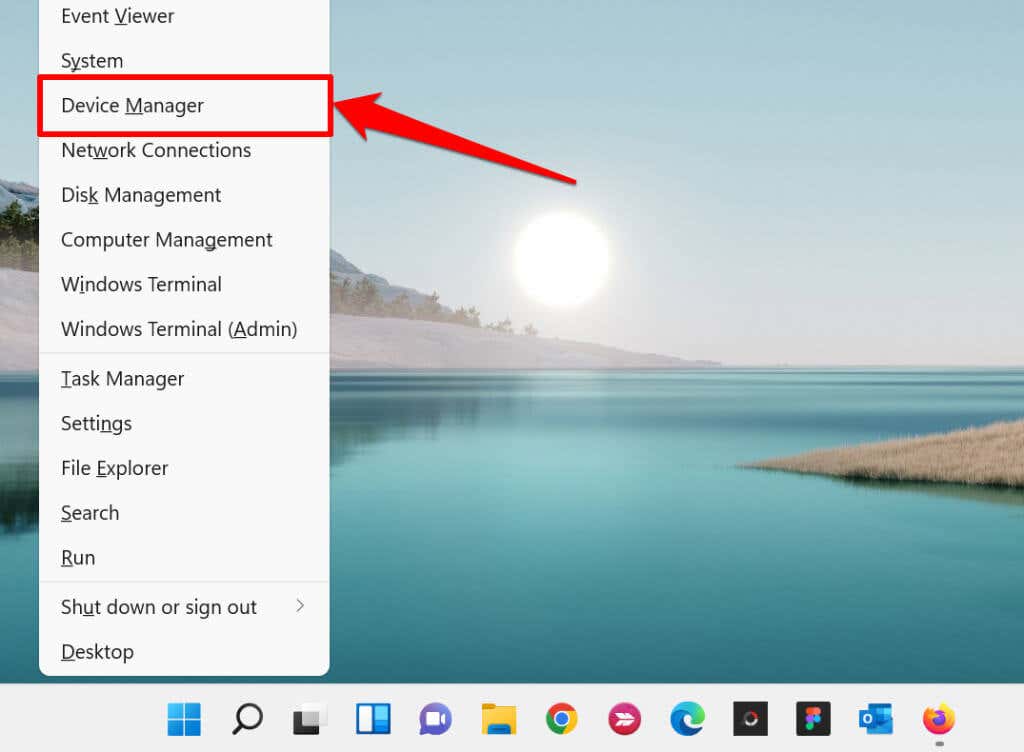
- Press Windows key + X and select Device Manager on the Quick Access menu.
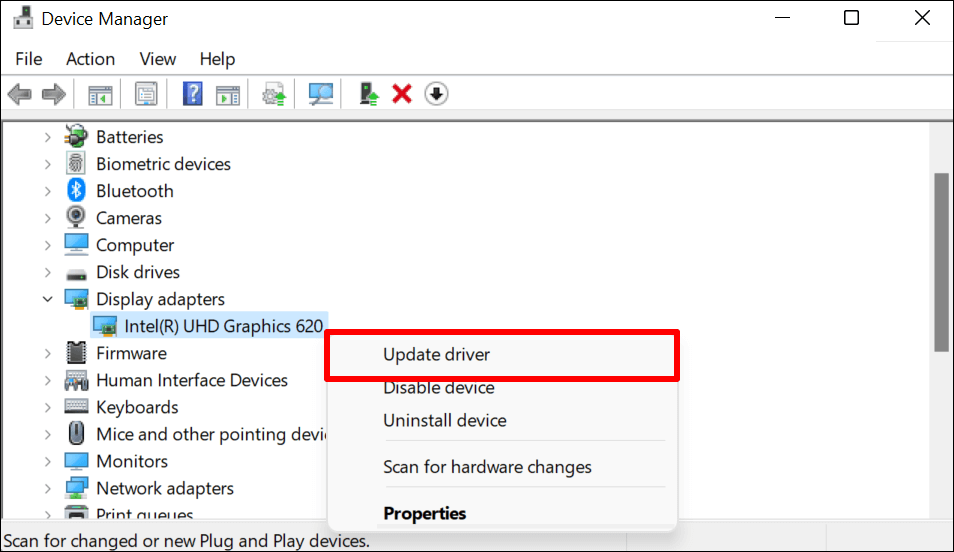
- Expand the “Display adapters” category, right-click your graphics driver, and select Update driver.
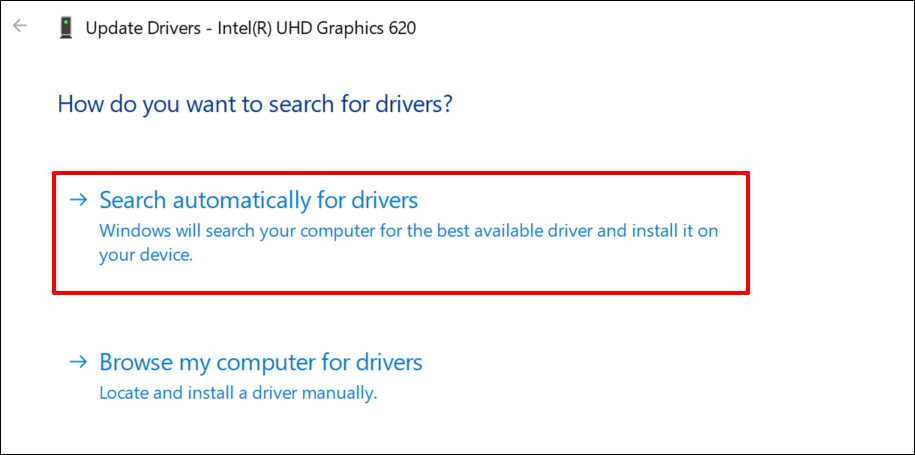
- Select Search automatically for drivers.
Note that automatically updating a driver requires an internet connection. So, make sure your PC is connected to a Wi-Fi or Ethernet network.
7. Enable TPM 2.0 and Secure Boot
Trusted Platform Module version 2.0 (TPM 2.0) is an essential requirement for running Windows 11. The TPM 2.0 component offers privacy and security-related features (Windows Hello, BitLocker, etc.) on Windows devices. It also protects against malware and stores security credentials like encryption keys, certificates, passwords, etc.
On the other hand, Secure Boot is a Windows security feature that stops malicious software from loading when your PC boots up.
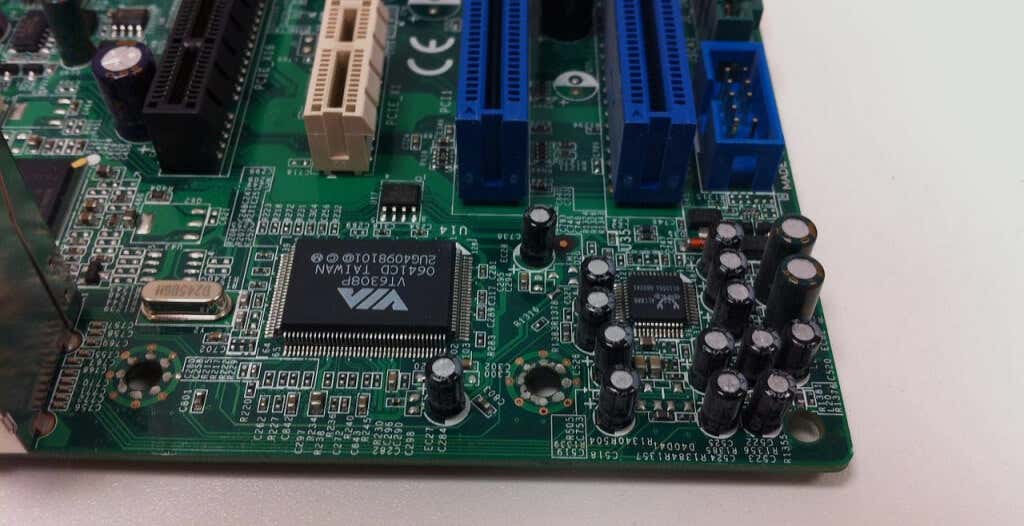
You can’t install Windows 11 if TPM 2.0 and Secure Boot are disabled on your computer. Or if your PC doesn’t support TPM 2.0.
Although TPM is always enabled by default in Windows, it’s sometimes disabled on motherboards used to build custom PCs. Follow the steps below to verify the TPM compatibility status of your Windows 10 computer.
Check TPM Specifications in Windows 10 Settings
According to Microsoft, most PCs released in 2017 or later can support TPM 2.0. Here’s how to check if your device supports the Trusted Platform Module (TPM) version required to run Windows 11:
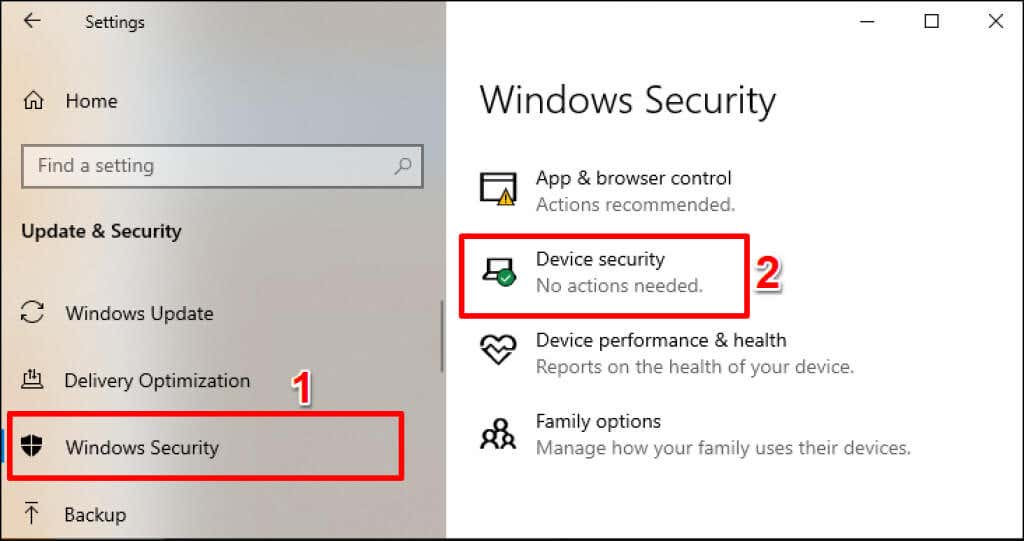
- Go to Settings > Update & Security > Windows Security and select Device Security.
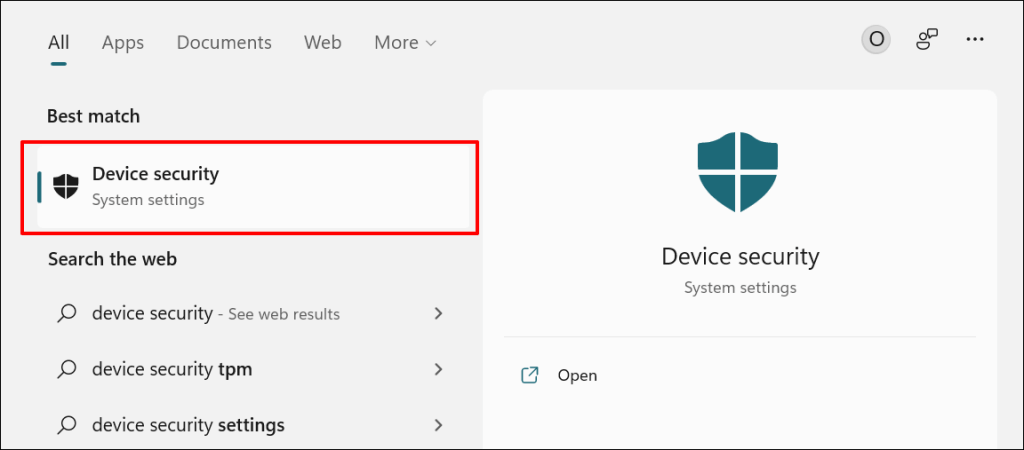
Alternatively, type device security in the Windows Search bar and select the Device security “System settings” option.
- If there’s a Security processor section on the “Device security” page, your PC is TPM-enabled. Select Security processor details to check your PC’s Trusted Platform Module version.
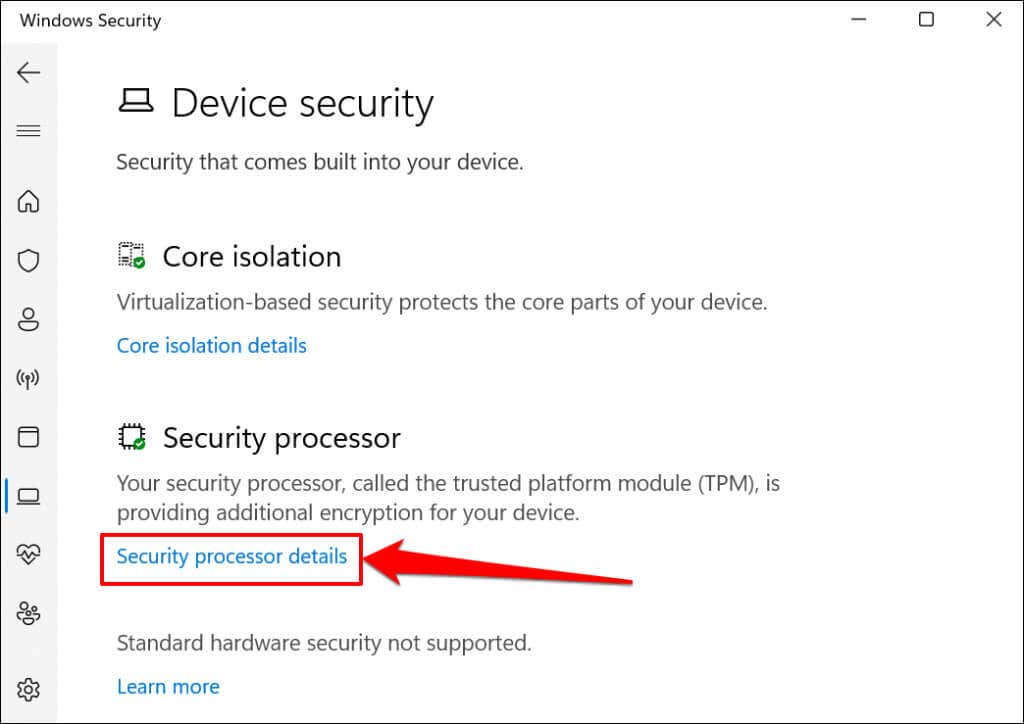
If you don’t see a “Security processor” section, your PC either doesn’t support TPM, or the module is disabled. Check the following section to learn how to enable TPM on your PC.
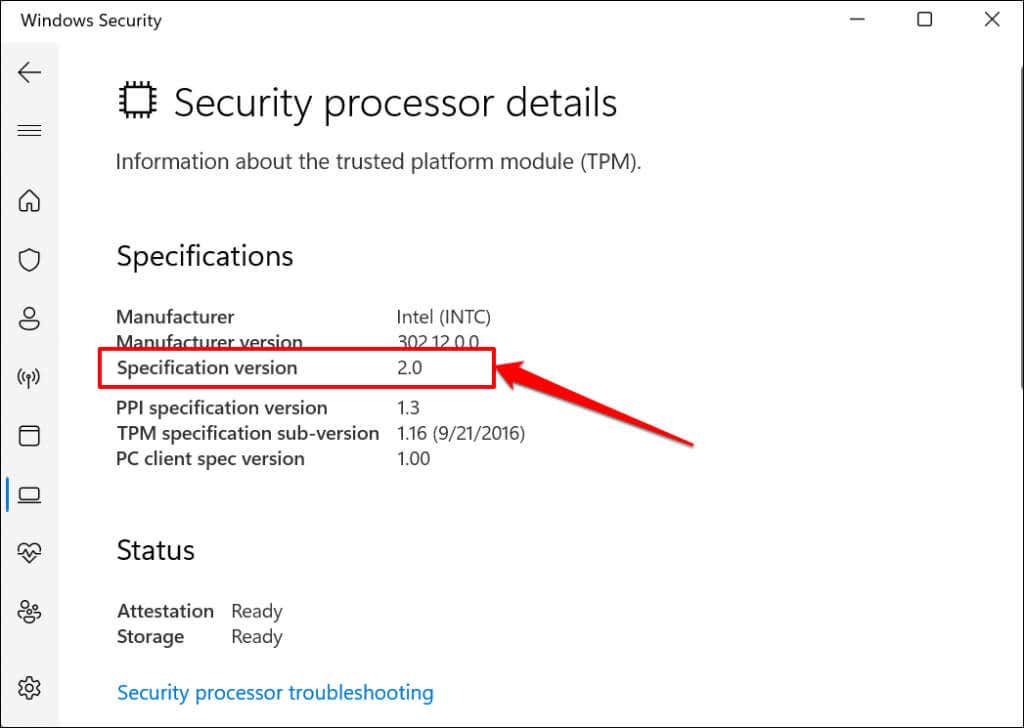
- Check the Specification version row and make sure it reads 2.0. If the specification version is below 2.0, your computer doesn’t meet the installation requirement for Windows 11.
You can also check TPM compatibility from Trusted Platform Module Management software–a standalone app for customizing and managing TPM in Windows.
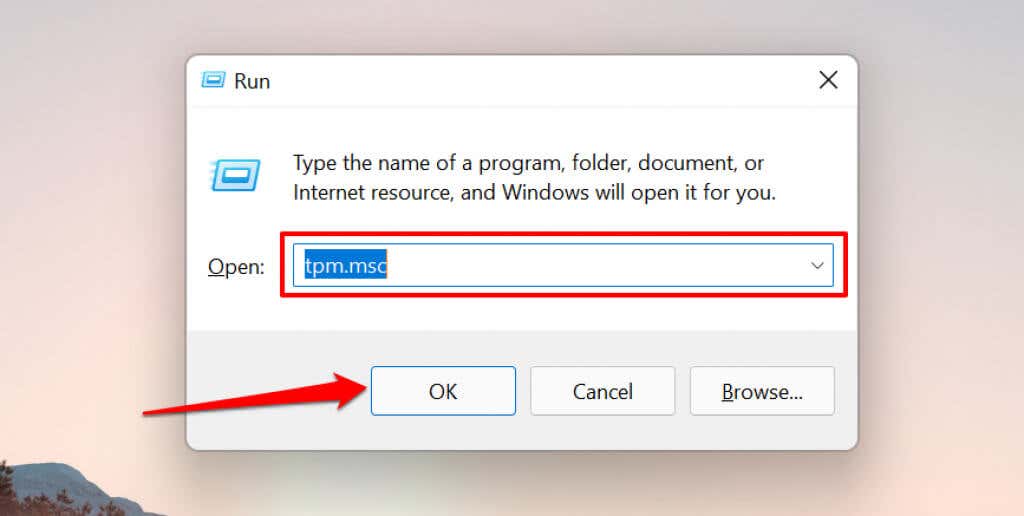
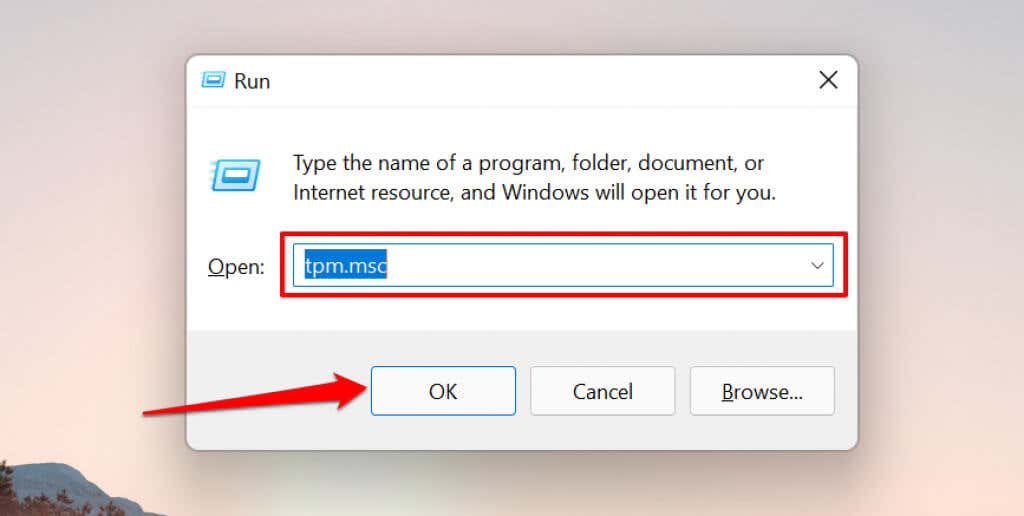
Press Windows key + R, type tpm.msc in the dialog box, and press Enter.
Expand the Status menu and make sure it reads, “The TPM is ready for use.” You should also expand the TPM Manufacturer Information menu to check your PC’s TPM “Specification Version.”
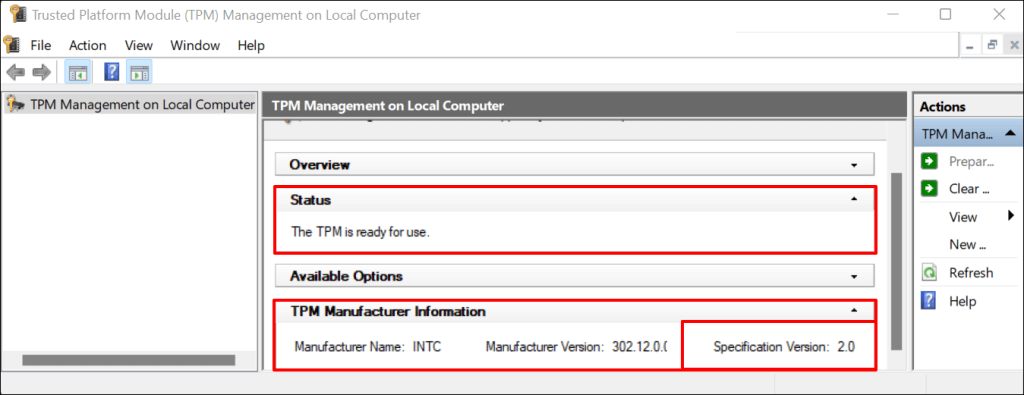
If TPM is disabled, proceed to the next section to learn how to turn the module back on. But if your PC uses TPM version 1.2, upgrade to a TPM v2.0 computer to use Windows 11.
Enable TPM and Secure Boot
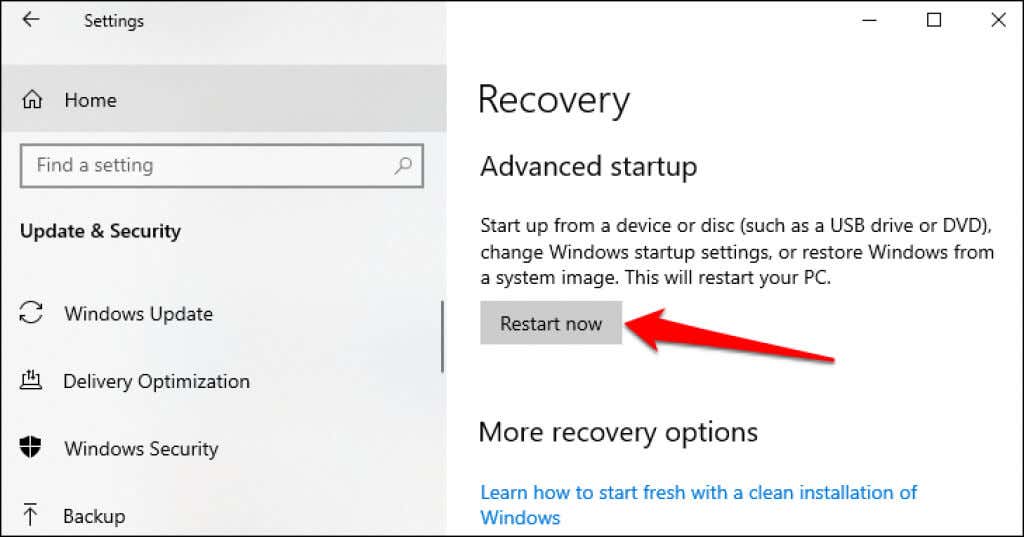
- Go to Settings > Updates & Security > Recovery and select Restart Now in the “Advanced start-up” section.
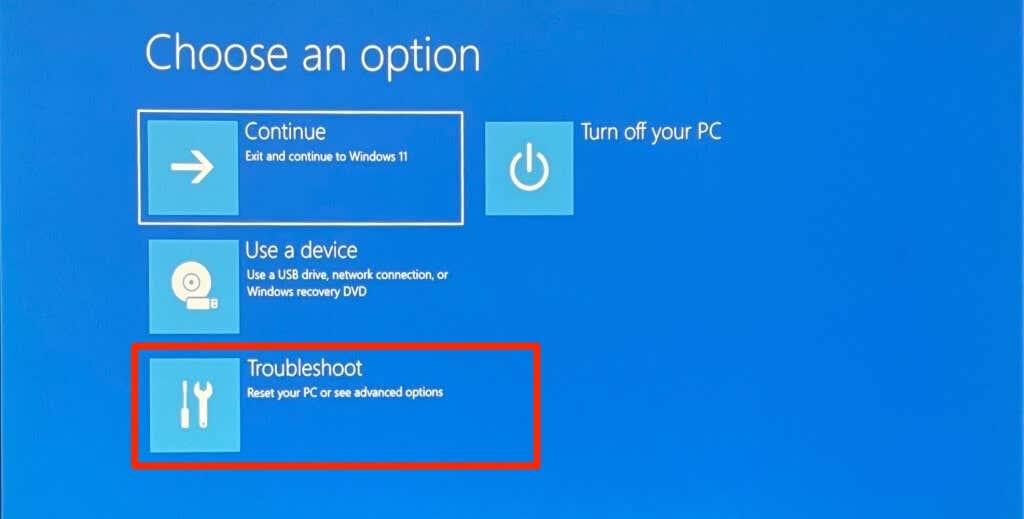
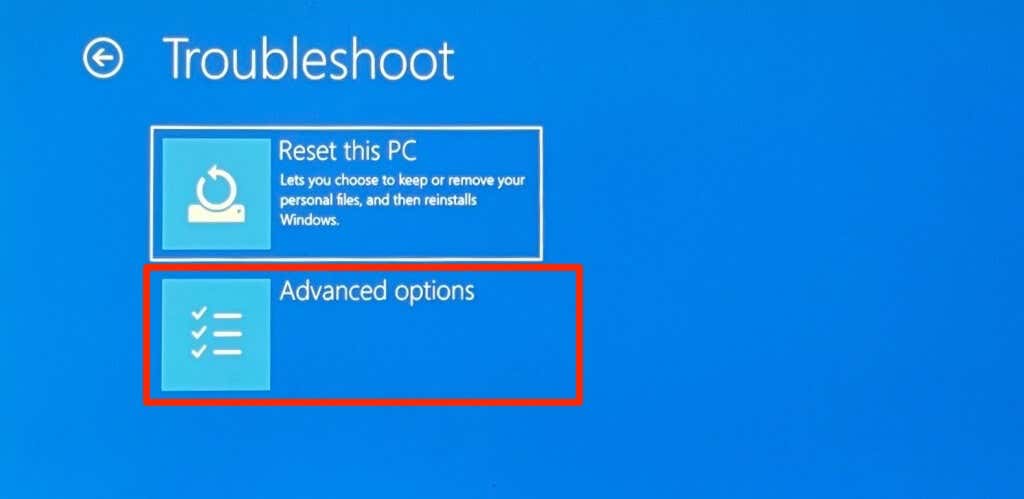
- Select Troubleshoot.
- Select Advanced options.
- Select UEFI Firmware Settings.
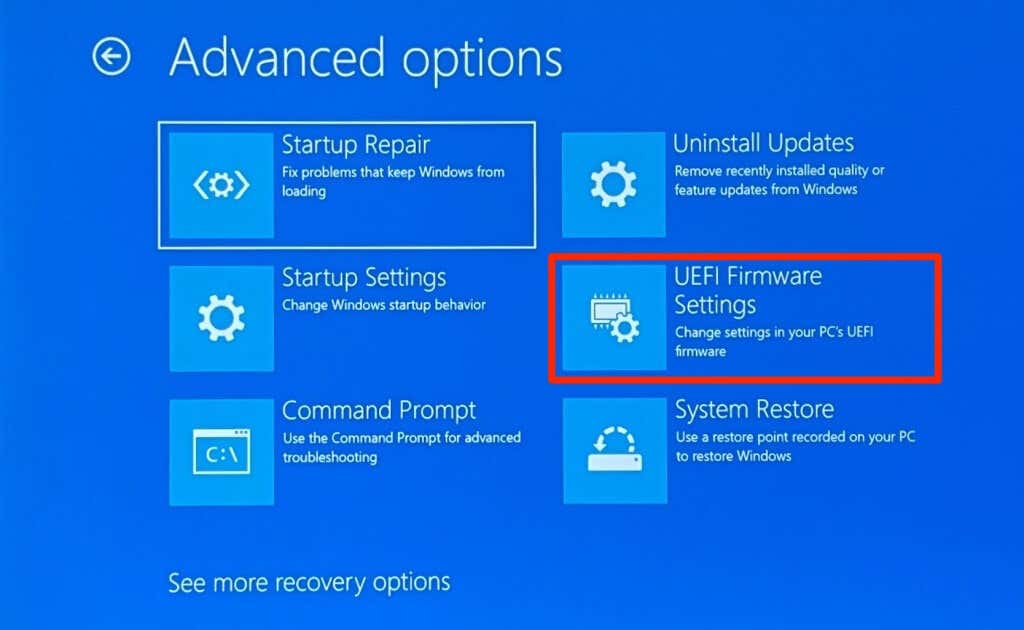
If you don’t find the “UEFI Firmware Settings” option on the page, your PC isn’t TPM-enabled.
- Select the Restart button.

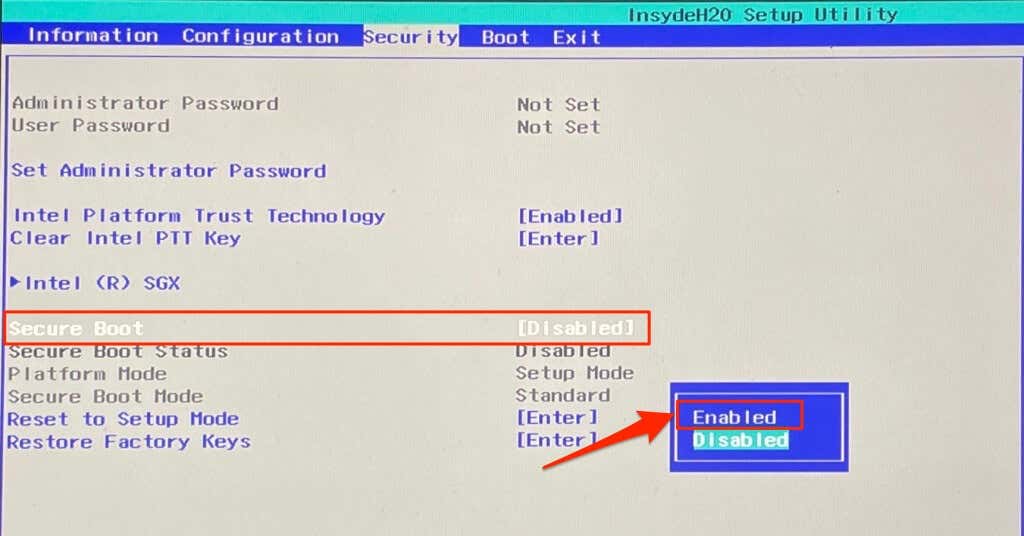
- Head to the Security tab and ensure “Intel Platform Trust Technology” is set to Enabled. Depending on your PC’s chipset, the TPM module may be labeled “TPM Device Selection,” “TPM Support,” “TPM 2.0 Security,” “TPM Switch,” etc.
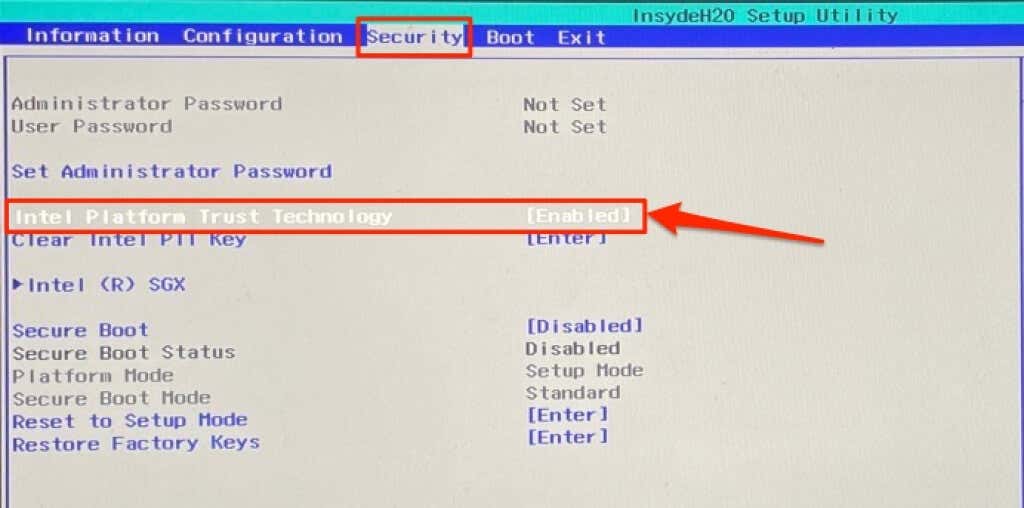
If TPM is disabled, press Enter, select Enabled using your keyboard arrow keys, and press Enter again.
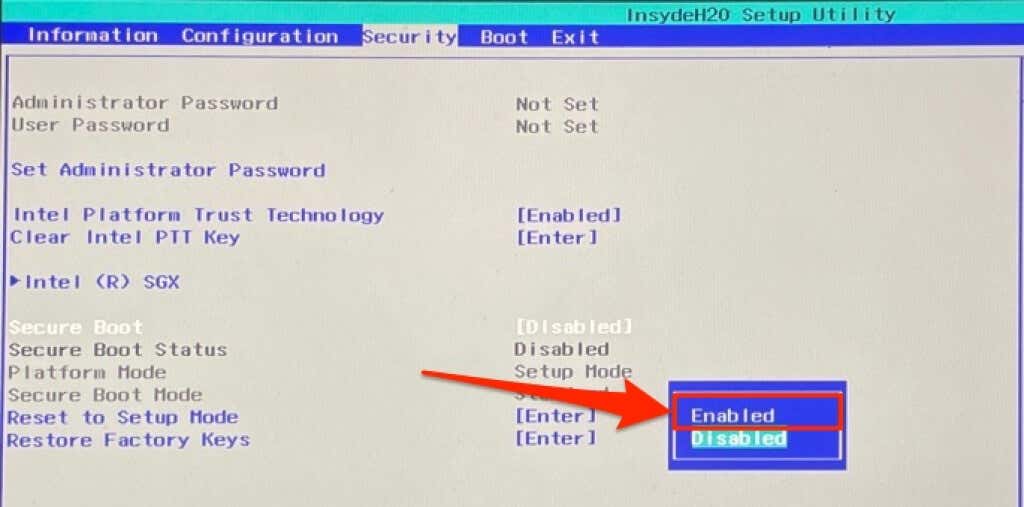
- Navigate to the “Secure Boot” row and ensure it’s also enabled. Otherwise, press Enter on your keyboard, set it to Enabled, and press Enter again.
- Head to the Exit tab, navigate to Exit Saving Changes, select Yes, and press Enter.
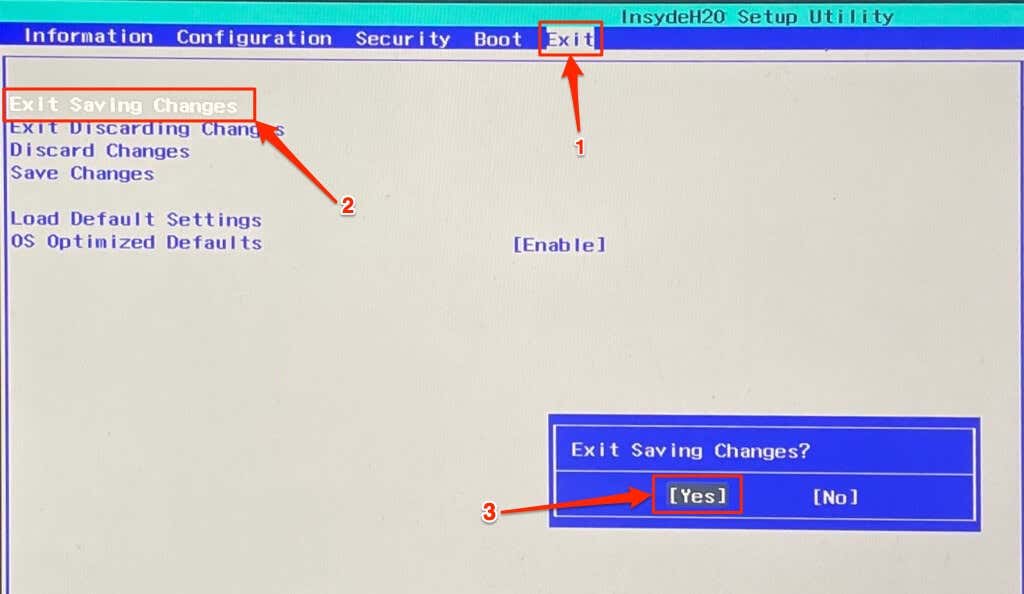
Try installing the Windows 11 update again when your computer comes back on.
8. Troubleshoot or Clear Your PC’s TPM
Depending on your PC’s hardware configuration, you may need to clear its TPM before installing a new operating system. Performing a TPM reset ensures that the new OS (i.e., Windows 11) can correctly deploy all TPM-related functionalities. Reset your PC’s TPM if all troubleshooting recommendations
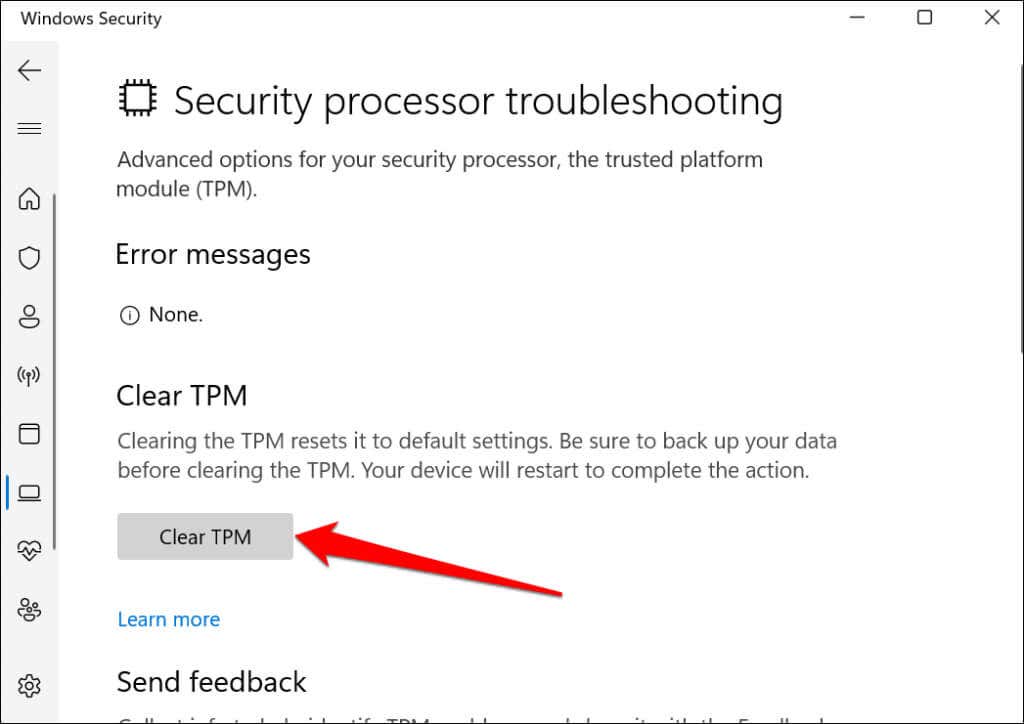
Note: Clearing your PC’s Trusted Platform Module (TPM) can result in data loss. All data and keys (e.g., BitLocker recovery key, sign-in PIN, etc.) encrypted in the TPM are removed. We don’t recommend clearing the TPM of a work PC, school computer, or devices you don’t own. Also, make sure you back up data encrypted by the TPM.
- Head to Settings > Update & Security > Windows Security and select Device Security.
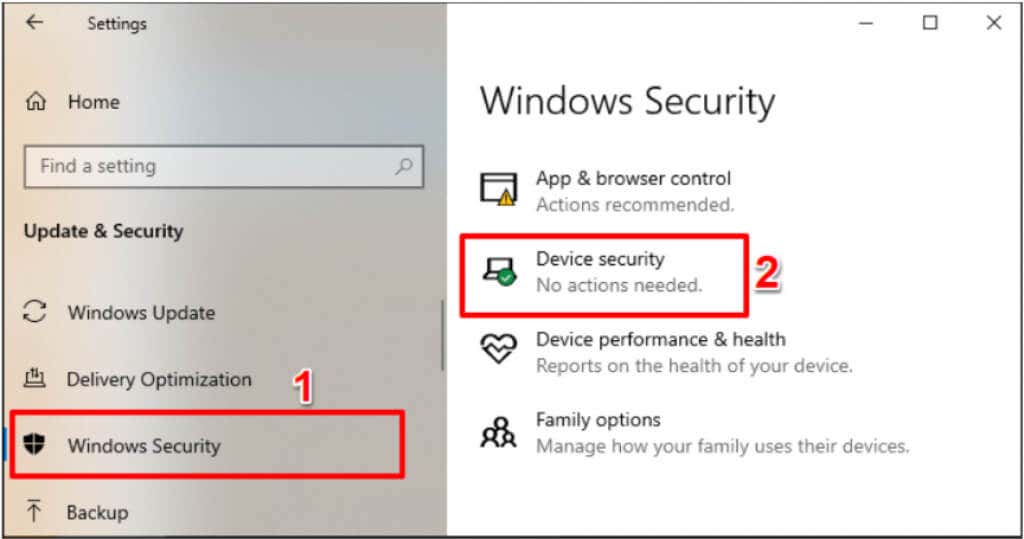
- Select Security processor details.
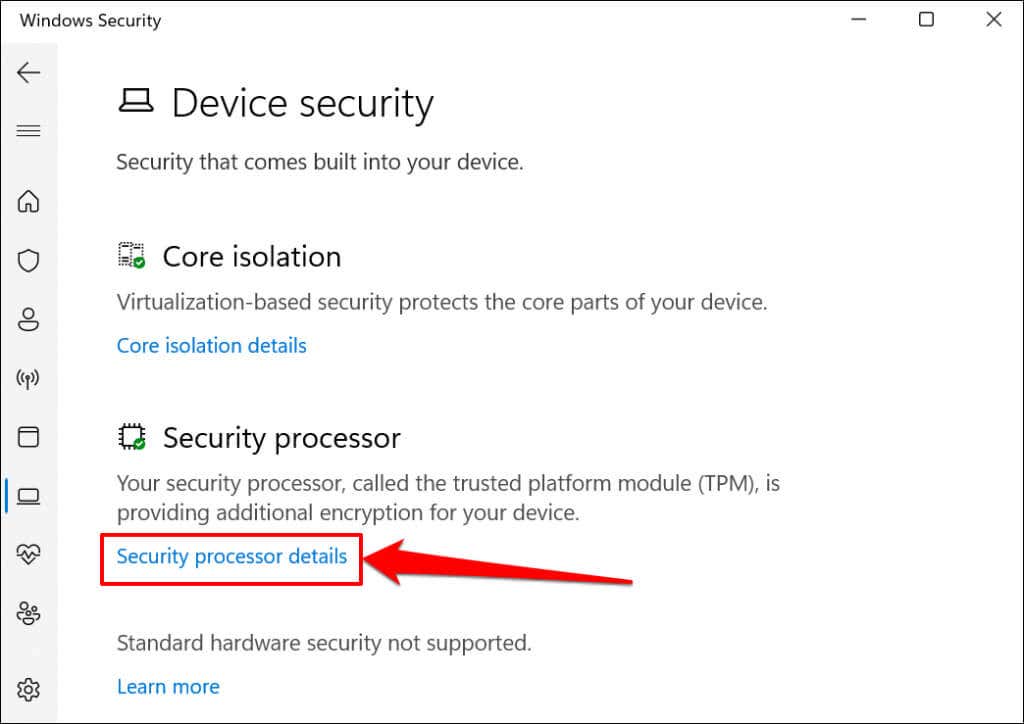
- Select Security processor troubleshooting.
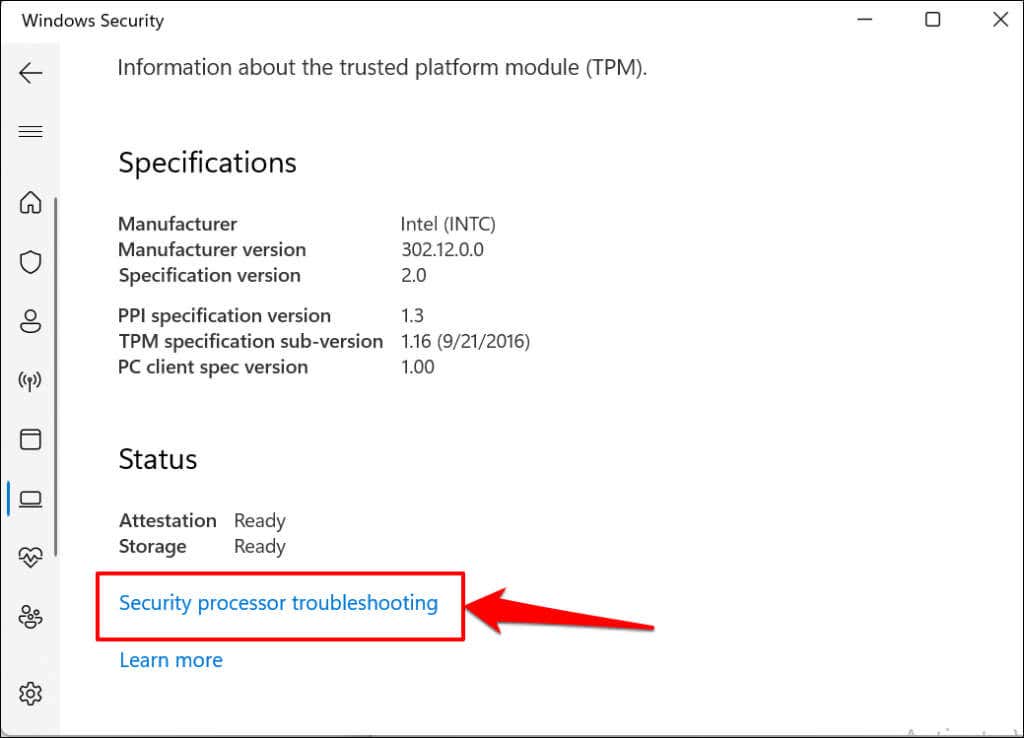
- Click the Clear TPM button.
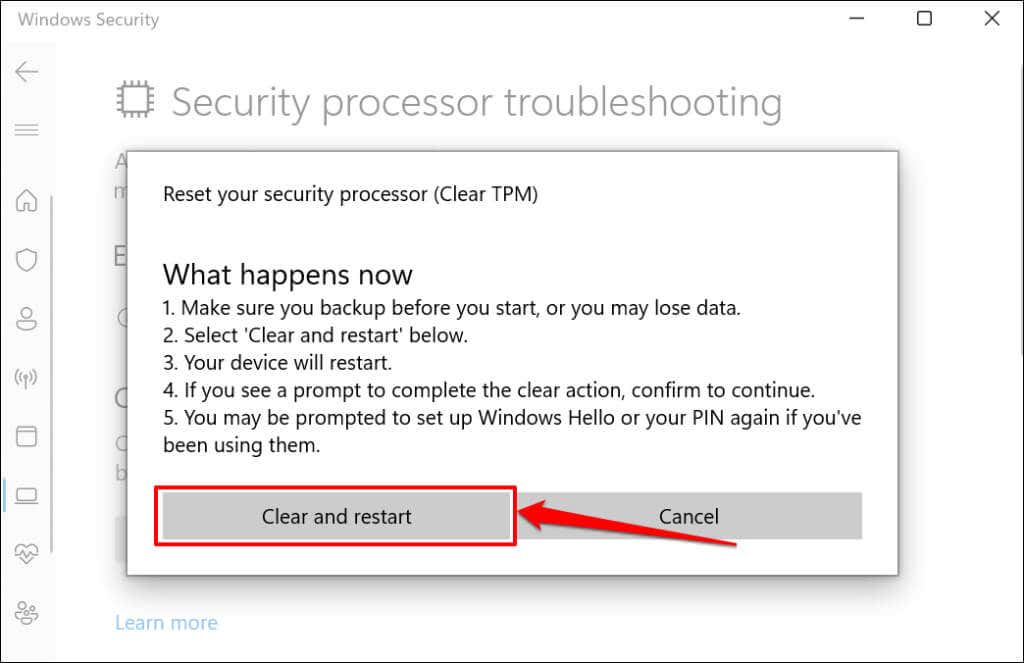
- Select Clear and restart to proceed.
ClearTPM via the TPM Management App
Windows has a dedicated app for customizing and managing the Trusted Platform Module Management app. Here’s how to use the app to reset your PC’s TPM:
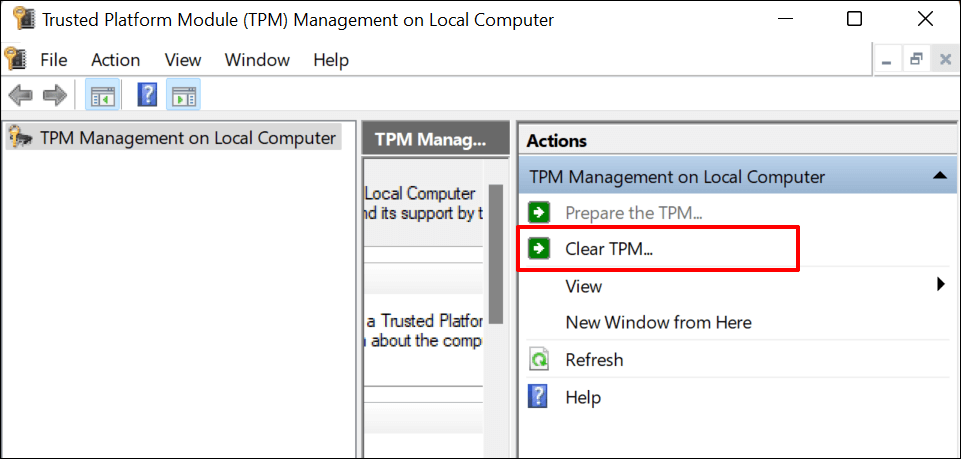
- Press Windows + R, type tpm.msc in the Windows Run box, and select OK.
- Select Clear TPM in the “Actions” tab.
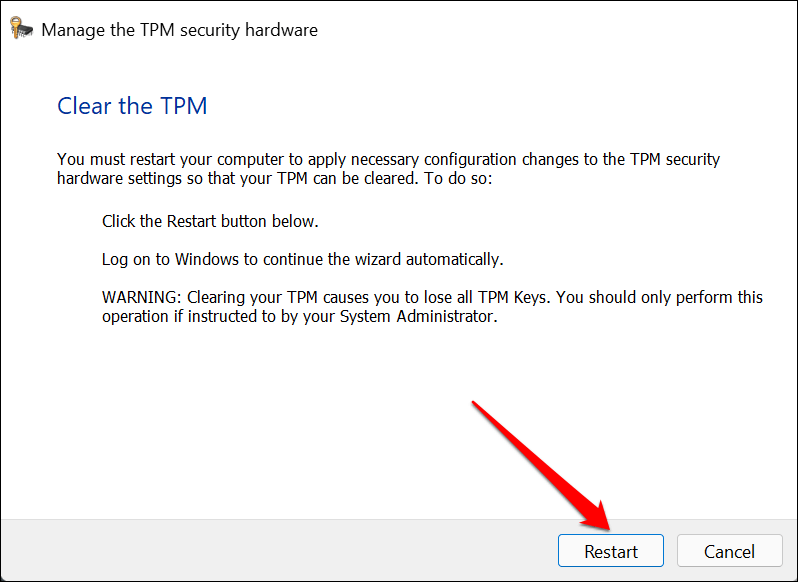
- Select Restart and try installing Windows 11 again when your PC comes back on.
9. Bypass TPM 2.0 and Secure Boot Checks
If the “Windows 11 installation has failed” error persists, bypass the TPM and Secure Boot checks for Windows 11 installation. Head to the Windows Registry and configure your PC to skip TPM 2.0 and Secure Boot verifications.
Note: Deleting essential system files in the Windows Registry can break your computer. We strongly recommend backing up your PC’s registry before making changes to the registry.
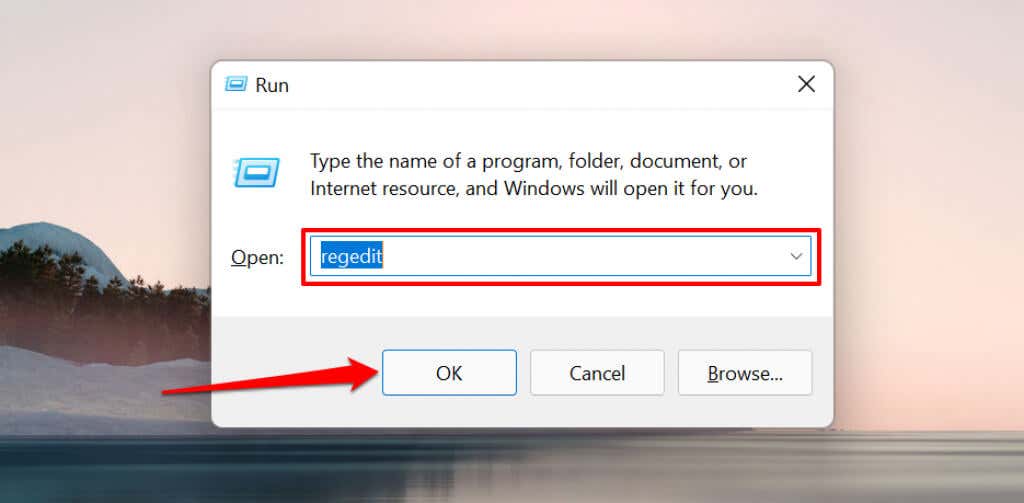
- Press the Windows key + R, type regedit in the Run box, and select OK to open the Windows Registry Editor.
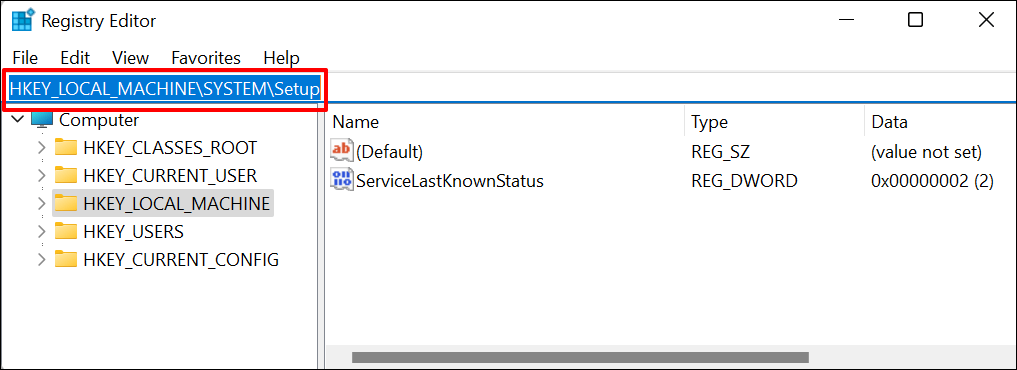
- Paste HKEY_LOCAL_MACHINESYSTEMSetup in the address bar and press Enter.
- Right-click the Setup folder on the sidebar, select New, and choose Key.

- Name the new key LabConfig and double-click the folder to open its contents.
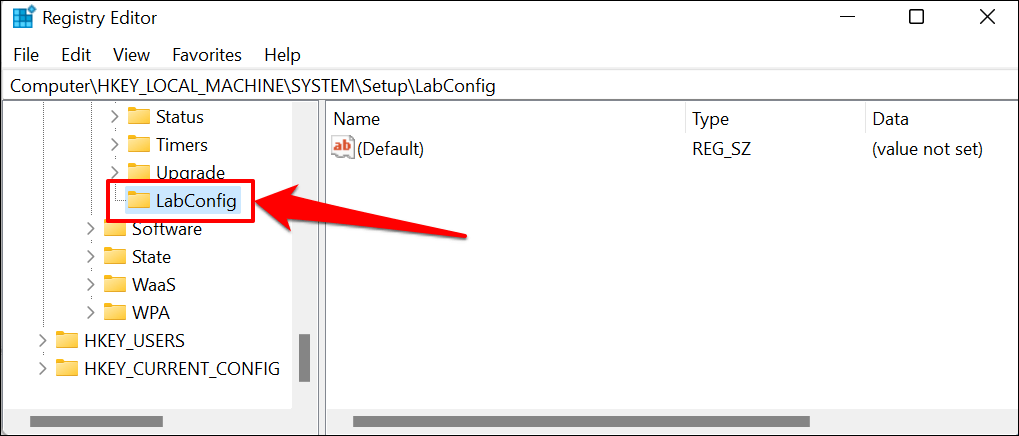
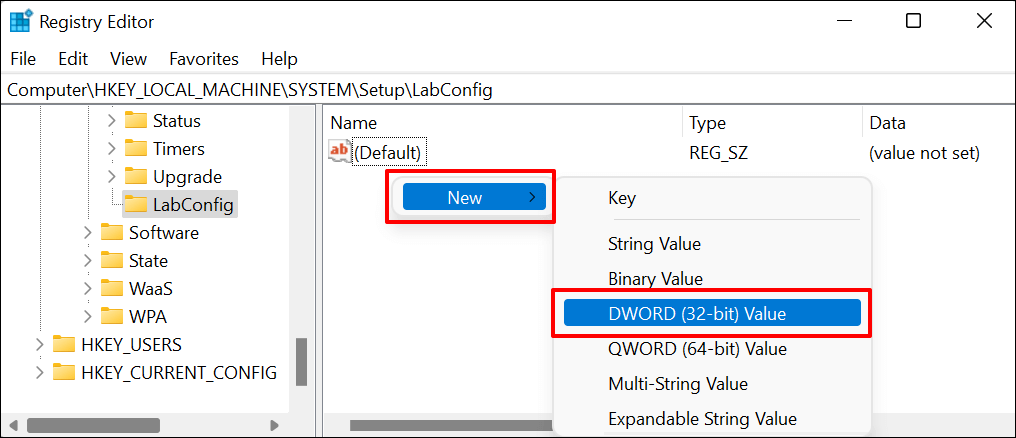
- Right-click an empty area in the right panel, select New, and select DWORD (32-bit) Value.
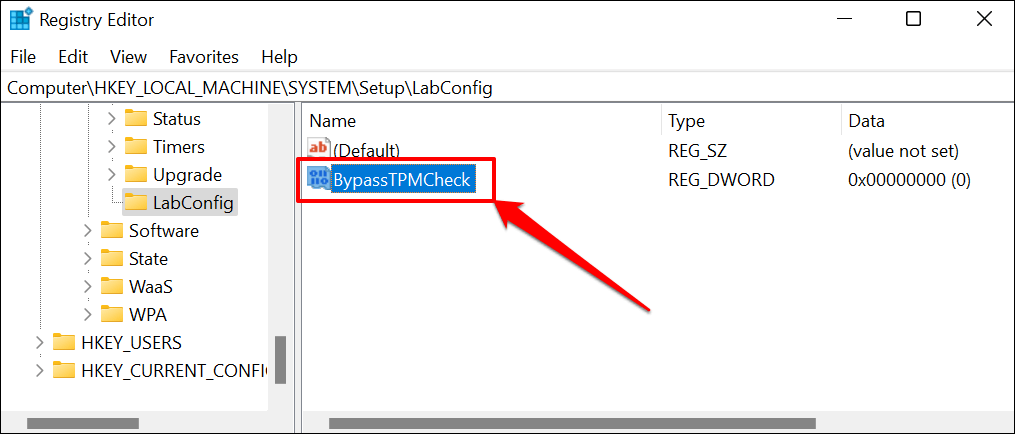
- Name the value BypassTPMCheck. Next, double-click the BypassTPMCheck value to proceed.
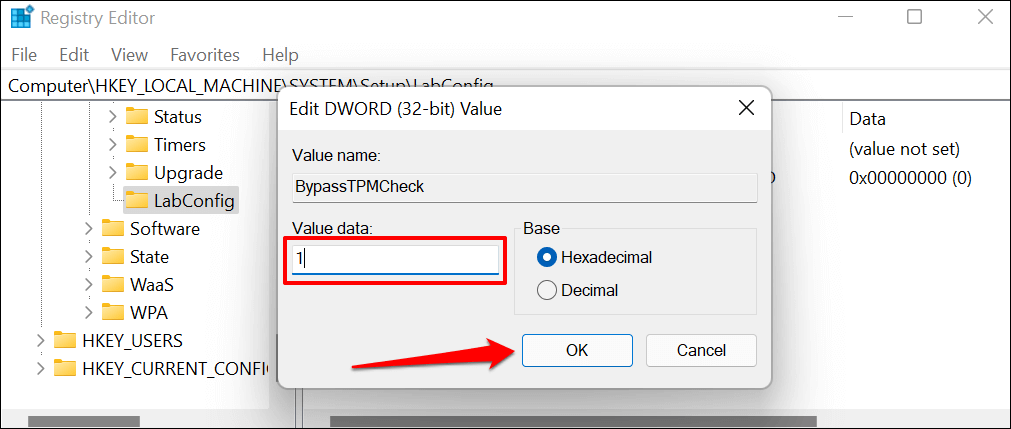
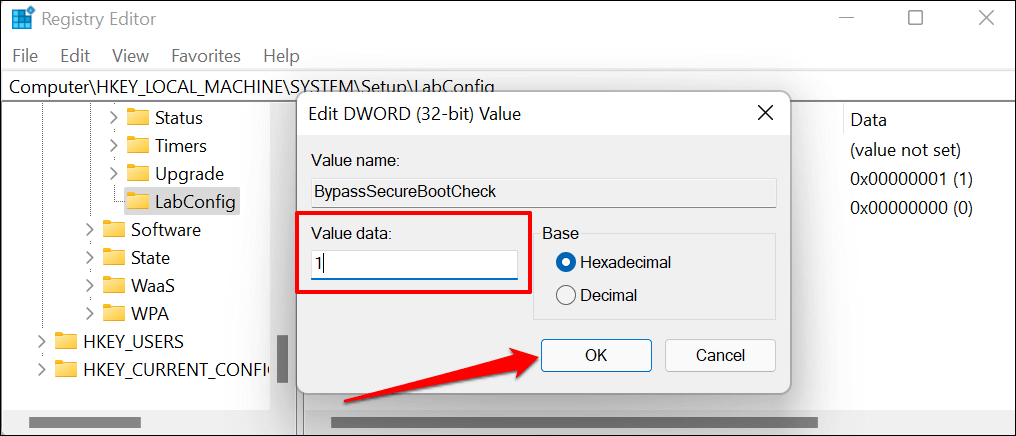
- Set the “Value data” to 1 and select OK.
- Create another value key and name it BypassSecureBootCheck. Right-click an empty area in the right panel, select New, and select DWORD (32-bit) Value.
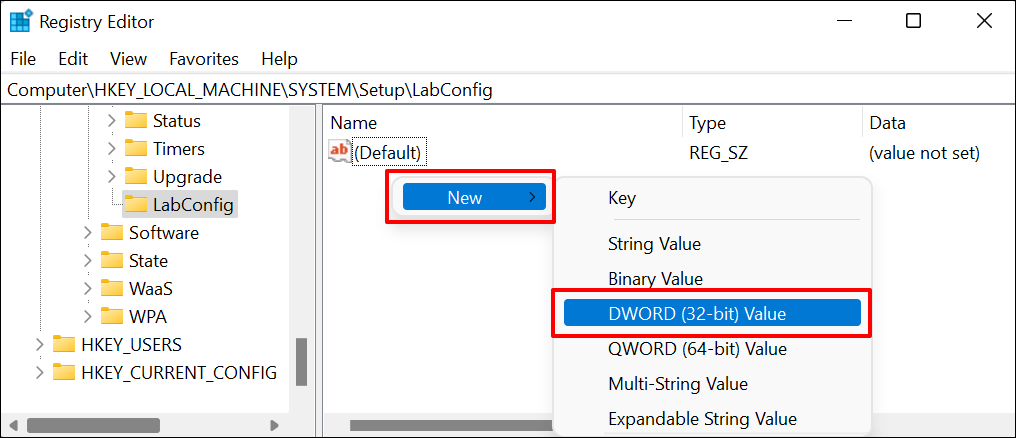
- Name the new registry key BypassSecureBootCheck.
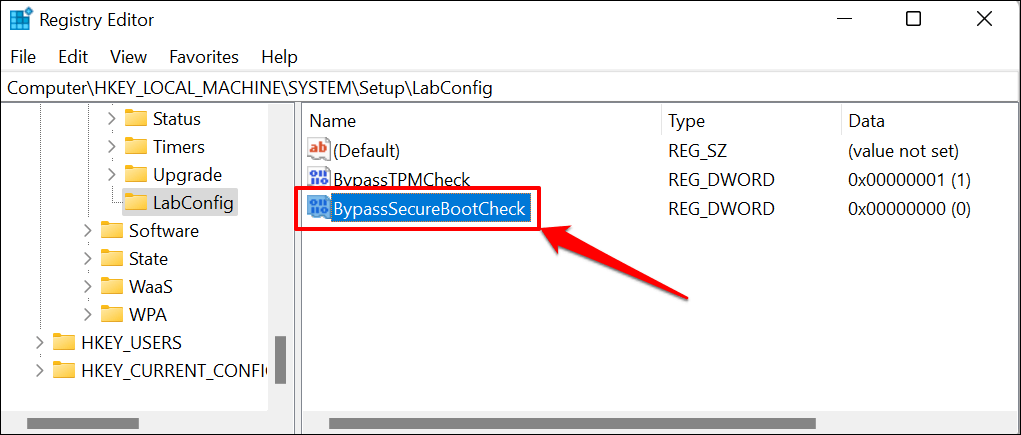
- Double-click BypassSecureBootCheck, set the “Value data” to 1, and select OK.
- Close the Registry Editor, reboot your computer, and try upgrading it to Windows 11.
Get Professional Support
If the error persists, try installing Windows 11 using a bootable USB drive instead. You should also try using the Windows 11 Media Creation Tool. Contact Microsoft Support or your PC’s manufacturer if you still can’t install Windows 11.


