The Windows Media Player (WMP) has a media sharing functionality that allows you to stream your PC’s media library to other devices over a network. Wmpnetwk.exe is the process that handles the media sharing service in the background.
When you enable media sharing on WMP for the first time, wmpnetwk.exe starts indexing your media library immediately. You may notice a spike in CPU usage during this operation, or when streaming media files to other devices.

That should plunge as soon as your files are indexed successfully. If wmpnetwk.exe continues to hog system resources when you aren’t sharing media files, jump to the troubleshooting steps below. But first, verify the safety and legitimacy of the wmpnetwk.exe file.
Contents
Wmpnetwk.exe Could Be a Virus or Malware
A virus or trojan can camouflage itself as the legitimate wmpnetwk.exe program file to infect your computer. So before anything else, verify that the wmpnetwk.exe slowing down your computer is the genuine program file.
1. Launch the Task Manager, go to the Details tab, right-click wmpnetwk.exe, and select Properties.
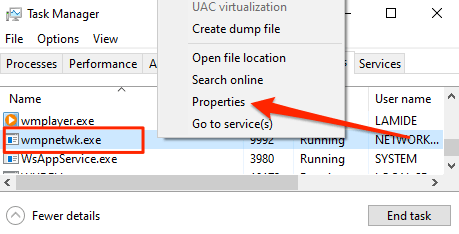
2. In the General tab, ensure the file location reads C:Program FilesWindow Media Player.

If the file is outside this folder, it’s most likely a malicious program camouflaged as wmpnetwk.exe. Run the file through your anti-malware scanner or delete it from your device immediately. However, if wmpnetwk.exe is in the appropriate location, the troubleshooting steps below should fix the problem.
1. Stop the Windows Media Player Network Sharing Service
To resolve the issue with wmpnetwk.exe using high memory or CPU resources, we recommend terminating the Windows Media Player Network Sharing Service. Press the Windows key + R to launch the Windows Run box. Type services in the dialog box and select OK.

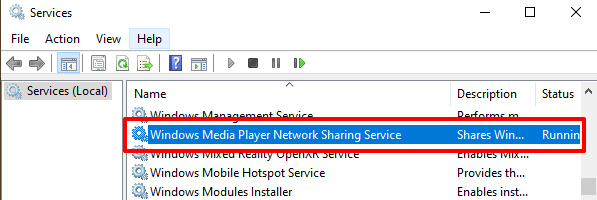
That’ll launch the Windows Services Manager. Scroll through the services on the list, right-click “Windows Media Player Network Sharing Service” and select Stop.

Head to the Task Manager and verify that Windows stopped the service. Reboot your computer and check the Task Manager in about 5 – 20 minutes. If the wmpnetwk.exe exploit has relaunched or otherwise continues running in the background, jump to the next troubleshooting step to change its startup behavior.
2. Disable Automatic Startup for the WMP Network Sharing Service
By default, Windows will start the wmpnetwk.exe process automatically about 2 minutes after your PC and other important services start. This is known as a “Delayed Start.”
The ripple effect of this startup type is that wmpnetwk.exe may linger in the background—endlessly consuming high memory and causing high CPU usage—even when you aren’t using the Windows Media Player.
Configuring the WMP Network Sharing Service to only run when you manually start it should resolve the problem. Open the Windows Services Manager and double-click “Windows Media Player Network Sharing Service.”
Select the Startup type drop-down button and select Manual from the options.

Afterward, select Apply and then select OK to save the change.

3. Disable the App’s Network Sharing Service
Configuring the WMP network sharing service to startup manually is a temporary fix, especially if you don’t use Windows Media Player. Disabling the service is a much better alternative.
You won’t be able to stream or share content to networked devices using Windows Media Player. But that shouldn’t be a problem since you don’t use the app, right? Besides, you can always re-enable the service any time in the future.
Open the Windows Services Manager, double-click Windows Media Player Network Sharing Service, select the Startup type drop-down button, and select Disabled.
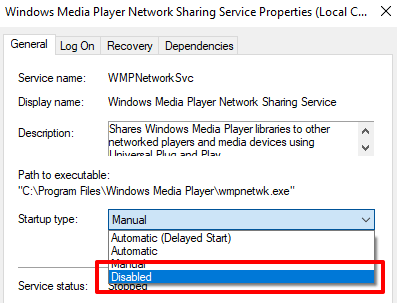
4. Turn Off Media Streaming
If wmpnetwk.exe encounters a problem while indexing or streaming your media files, it could get stuck in the background. Disabling media streaming should solve the problem, especially if you don’t plan to stream your media files with other devices.
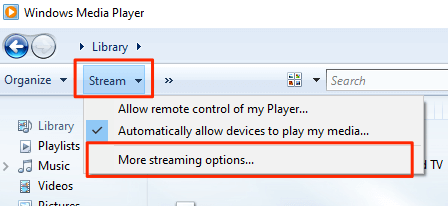
1. Launch the Windows Media Player, select the Stream drop-down option at the top-right corner, and select More streaming options.
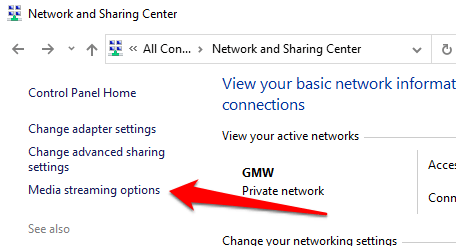
2. Alternatively, open the Windows Control Panel, select Network and Sharing Center, and select Media streaming options on the sidebar.
3. Finally, uncheck the Allowed box next to “Media programs on this PC and remote connections” and select OK to save the change.

That’ll disable media streaming on your local network and stop the wmpnetwk.exe process from running in the background.
5. Uninstall Windows Media Player
You’ll never have to deal with the wmpnetwk.exe menace if you remove Windows Media Player from your computer. It’s a permanent solution to the problem—like unrooting a weed from your garden.
Consider uninstalling Windows Media Player in the unlikely event that none of the troubleshooting steps above fixed the problem. Or, if you use third-party media players or servers like VLC, Quicktime, Plex, or Kodi.
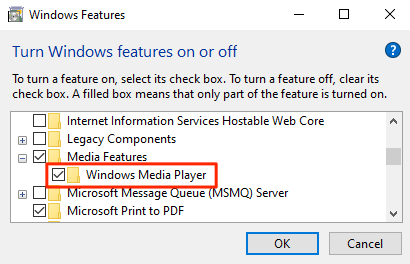
1. Launch the Control Panel, select Programs and Features, and select Turn Windows features on or off.
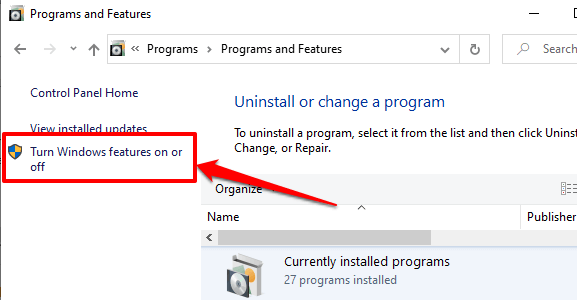
2. Expand the Media Feature folder, uncheck Windows Media Player, and select OK.
3. Select Yes on the confirmation prompt to proceed. You may need to provide your account credentials during the process.
[15-uninstall-windows-media-player-01]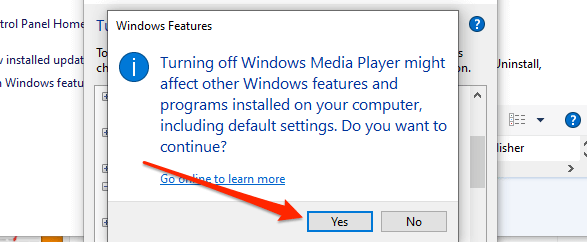
4. Restart your PC for the changes to take effect. If you ever need to reinstall the app, refer to this guide on downloading Windows Media Player 12 for Windows.
Did terminating wmpnetwk.exe resolve the high memory or CPU usage issues? Or did you have to stop or disable the process? Let us know which one did the trick.

