A drop-down list is the handiest way to let people choose from specific items for a field in a Microsoft Word document. The option to add a drop-down list is a bit hidden in Microsoft Word, but this tutorial makes it easy.


Contents
How To Enable Developer Tab in Microsoft Word
The drop-down list feature is available under the hidden Developer tab in Microsoft Word. You can go to Word options in Windows and macOS to enable this menu by customizing the Ribbon.
In Windows, you can enable the Developer tab in Microsoft Word by going to File > Options. In the Options dialog box, select Customize Ribbon in the sidebar. On the right side, under the Customize the Ribbon section, enable the Developer menu and click the OK button.
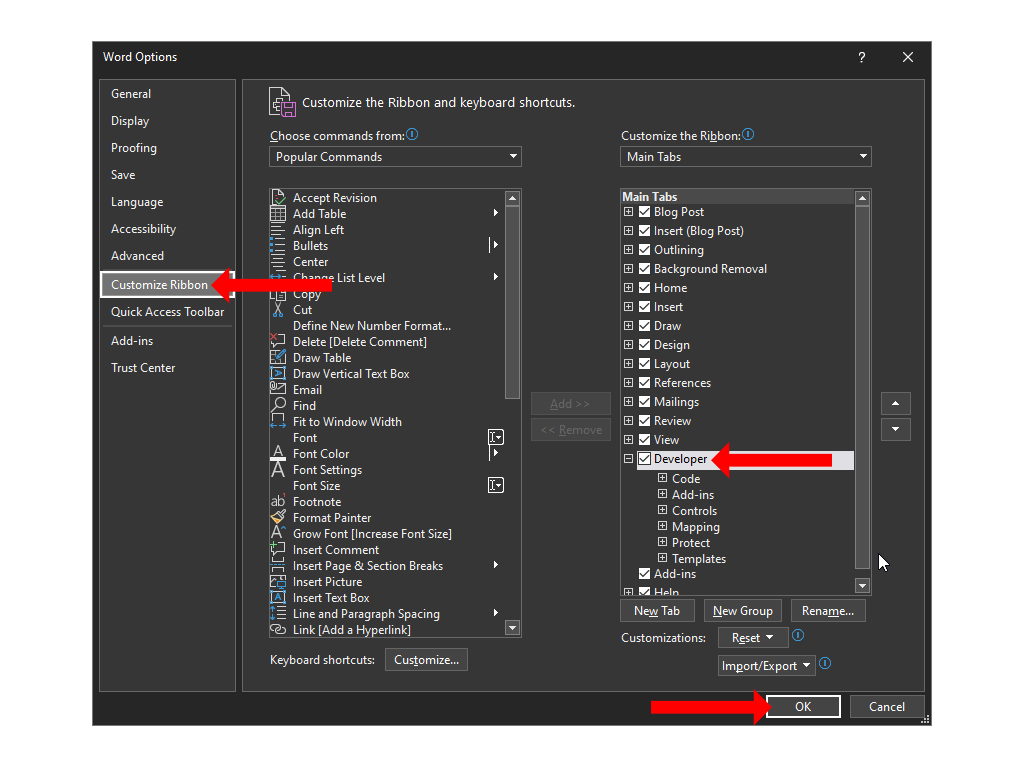
On a Mac, go to the Word menu > Preferences > Ribbon and Toolbar. Here, you can check the Developer option and hit Save.
You’ll now be back in your Microsoft Word document and at the top, you will see the Developer tab in between the View and Help tabs.
Note: You can also add the Developer tab to Microsoft Excel and Microsoft PowerPoint by following the same steps.
How To Create a Drop-Down List in Microsoft Word
To add a drop-down list to your Microsoft Word document, click the Developer tab at the top and then select Drop-Down List Content Control. This drop-down list will be empty by default and you’ll have to customize it to add useful options to the text box.

To customize the drop-down box, click once inside the box. Select the Properties button located in the Controls section of the Developer tab in Microsoft Word.

In the Content Control Properties window, you’ll see several options to help you customize the drop-down list.
You can add a title, a tag, and pick the design and color of the box first. A subtle color works best for most people because the drop-down menu shouldn’t take attention away from other parts of the Word document. The option labeled Remove content control when contents are edited is an important check box in the Content Control Properties window. If you enable this, the drop-down list will automatically change to normal text when an option is selected.
In the Locking section, you can choose if you want to allow the drop-down list to be edited or deleted. Finally, the Drop-Down List Properties section is the most important one. You can click the Add button to key in each option to the drop-down list. Your additions will appear below the Display Name sub-head. If you make a mistake, you can click Modify to change the text in any of your options.
The Remove button will allow you to get rid of a few options from the drop-down menu, and you can use the Move Up or Move Down buttons to change the order of various options. When you’re done making changes, click OK to close the dialog box.
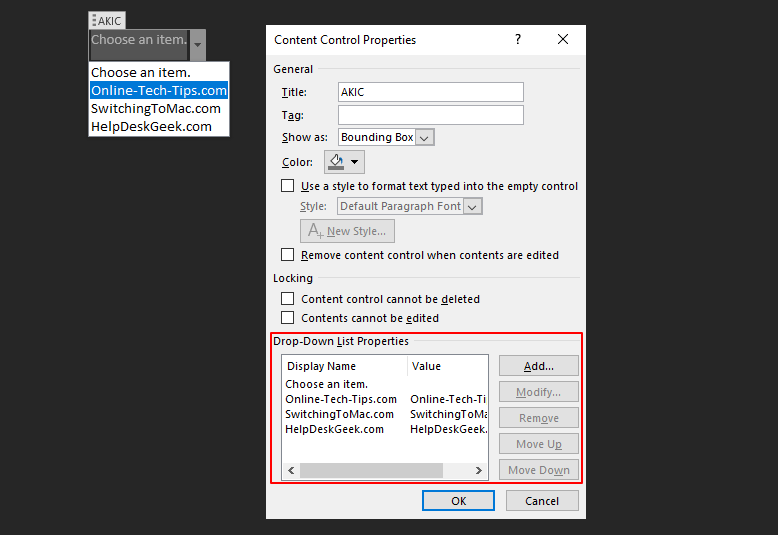
Once a drop-down list is added to the document, you can click the down arrow on the right side of the menu to reveal the picker. Select the option you want and it’ll be recorded as your response in the drop-down list.
Combo Box vs Drop-Down List in Microsoft Word
In the Developer tab in Microsoft Word, you’ll see a button labeled Combo Box Content Control right next to Drop-Down List Content Control. These two options are similar because both of them allow you to present a list of choices but they’re not the same.
The Combo Box lets people add their own custom entries in addition to those provided in the drop-down list. You can treat a Combo Box like a fillable form and type whatever you want. Unlike the Combo Box, a Drop-Down List cannot be used as a form field in Microsoft Word.
To add a Combo Box in your Word document, first you should add the Developer tab as we’ve described earlier. Then click the Combo Box Content Control button in the Controls group of the Ribbon Menu in your Word document.

This will add the Combo Box to the document. To customize it, you can move the cursor inside the Combo Box, click once, and then select the Properties button in the Ribbon Menu.
Once the Combo Box is inserted in your document, you can either select one of the options in it or you can double-click inside the box to type a custom response instead.
In case you’re working on other Microsoft Office apps, the Combo Box option is also available in PowerPoint and Access.
Remove Drop-Down List or Combo Box in Microsoft Word
If you want to remove a drop-down list or a combo box from your Word document, you can right-click the one you want to remove and select Remove Content Control. Alternatively, you can also move the cursor to the left side of the Combo Box or drop-down list.
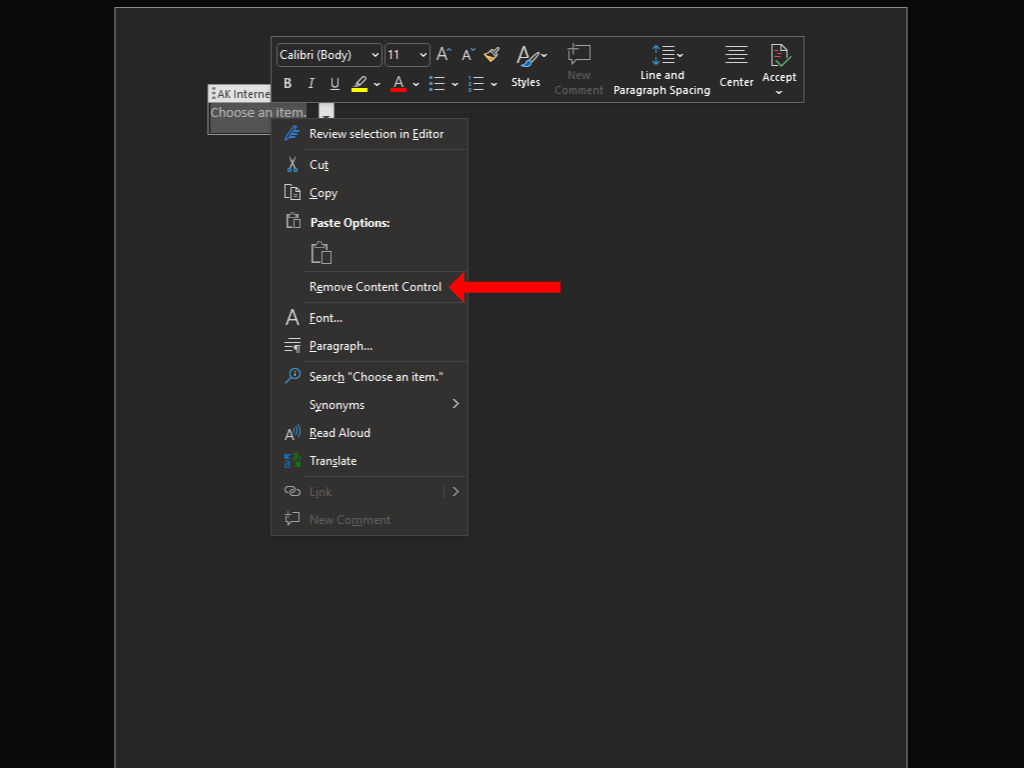
When the cursor gets inverted, click once to select the drop-down list or combo box, and press Backspace or Delete on your keyboard to remove it.
Customize Your Documents Even More
A drop-down list is just one of the many ways to add a bit of interactivity to your document. Since you’ve begun customizing your Word documents, you may also be interested in creating custom shortcuts in Microsoft Office.
Now that you’ve learned how to create a drop-down list in Microsoft Word, you should try creating one in Excel too. If you prefer Google’s suite over Microsoft Office apps, you can try using a drop-down list in Google Sheets instead.

