If you buy a new mouse, you might be surprised by how quick it is. A higher DPI (dots per inch) rating for your mouse means greater accuracy in picking up the smallest of movements. This isn’t always ideal, and you may prefer to lower the sensitivity on your mouse by reducing the mouse speed.
Thankfully, it’s easy to change your mouse speed in Windows 10. You can use the built-in Windows settings for your mouse to do this, or you can use a third-party solution. Your mouse may even include an easy-access sensitivity button to switch between settings. To change your mouse speed, here’s what you’ll need to do.


Contents
Change Mouse Speed In Windows 10 Settings
If you want to tweak your mouse speed and overall mouse sensitivity, the best place to start is in your Windows 10 settings area. Windows allows you to change various settings that can impact on how you use your mouse or trackpad, including the ability to change button actions, line scrolling speeds, and cursor speeds.
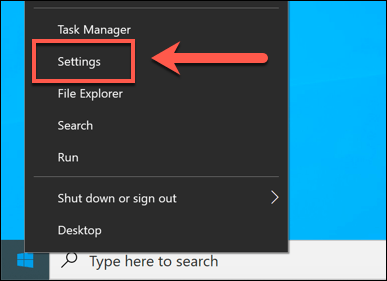
- To change any of the built-in Windows 10 mouse settings, you’ll need to access your Windows 10 settings area. To do this, right-click the Windows Start menu and click Settings.
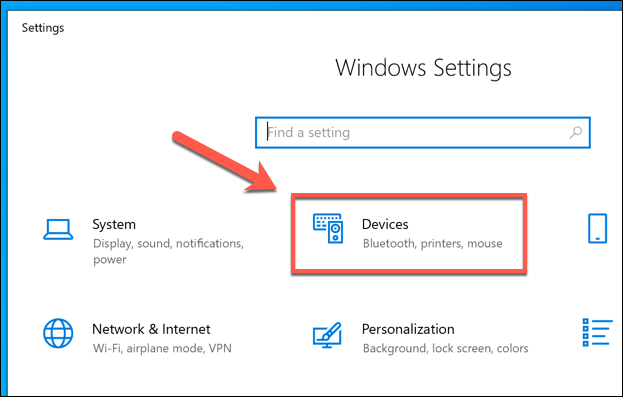
- In the Windows Settings menu, click the Devices option to enter that menu.
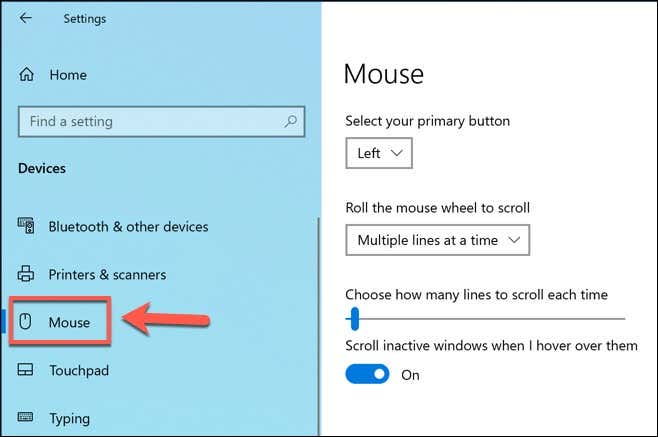
- Click Mouse in the left-hand menu to access some of the more basic mouse settings. From here, you can change your mouse scroll speeds and line length, as well as change some basic mouse button actions.
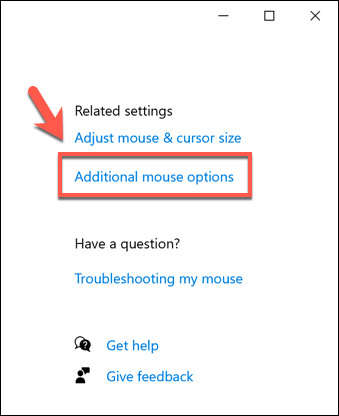
- For more advanced mouse settings, click the Additional Mouse Options option under the Related settings section on the right (or at the bottom if the window is too small).
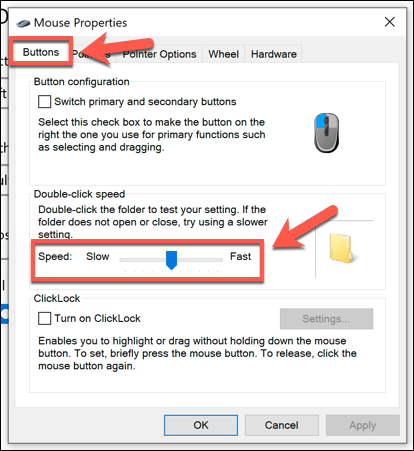
- Under the Buttons tab of the Mouse Properties window, you can change the double-click speed. This is the speed you’ll need to be able to perform a double clicking action for Windows to register it. To change this, move the slider towards the left to slow the speed down, or right to speed it up.
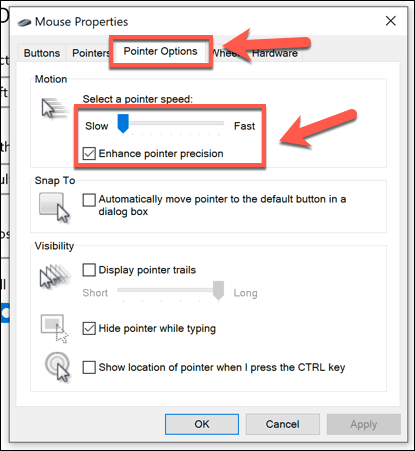
- You can change the action speed of your mouse cursor under the Pointer Options tab. Move the slider under the Select a pointer speed section to do this, moving it left to slow it down, or right to speed your cursor up. If you find that your pointer isn’t as precise, click to enable the Enhance pointer precision checkbox.
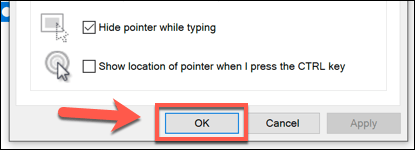
- Once you’re happy with the changes you’ve made, click OK to save and close the window. Any changes you’ve made will be applied automatically and can be quickly tweaked or reversed, if needed.
Using The Windows Registry Editor To Change Mouse Sensitivity
If you’re comfortable tweaking with the Windows Registry, then you can use the Windows Registry Editor to change some of your mouse sensitivity settings instead. This could allow you to make more precise changes to your mouse speed compared to using the Windows 10 settings menu.
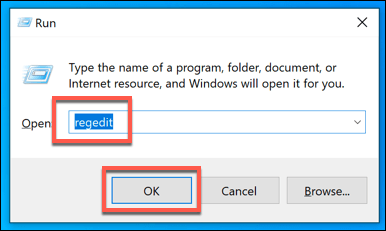
- To do this, press Ctrl+R on your keyboard to open the Run dialog box. Type regedit into the box, then click OK to open it.
- Using the registry navigation menu on the left, head to KEY_CURRENT_USERControl PanelMouse to view the registry entries for your mouse settings.
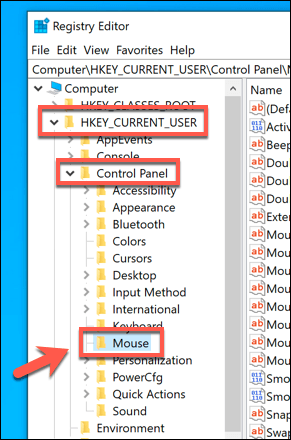
- You’ll see various registry entries for your mouse settings, but one of the most important is the MouseSensitivity entry. Double-click the entry to change the value to any figure up to 20.
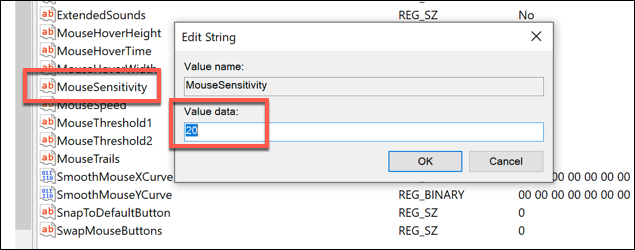
- You can also tweak how precise your cursor movements are using the MouseSpeed, MouseThreshold1 and MouseThreshold2 entries. Your mouse movements will double when the value for MouseSpeed equals or is greater than the value for MouseThreshold1, and quadruples for MouseThreshold2. The values reflect distance travelled by pixels.

- These entries have a default value of 0, but you can see their default values by enabling the Enhance pointer precision checkbox first (Windows Settings > Devices > Mouse > Additional Mouse Options). If you want to set it to maximum, set MouseSpeed to 2, and set the value of MouseThreshold1 and MouseThreshold2 to 0.

- Once you’re done, close the Windows Registry Editor. Any changes you make should be applied automatically, but you may need to restart to see some of the changes take effect.
Using a Third-Party Mouse Settings App
While cheaper mice and keyboard combos are typically supplied without software, more advanced gaming mice will often come with manufacturer settings apps that allow you to tweak and change how they operate. They can also help to unlock additional features, supported by your mouse but not by Windows directly.
If your mouse comes with a DPI settings button (as many gaming mice do), you’ll need to install the settings software from the manufacturer to allow you to set up the different sensitivity profiles that the button supports. Popular gaming manufacturers, including Logitech and Razer, offer this feature.

One example of software that you can use to control your mouse settings is Logitech Gaming Software, designed to support Logitech-branded gaming equipment, including mice and keyboard. Installing this software will allow you to control various settings for your mouse, including the speeds.
In the first instance, check the website for your mouse manufacturer to see if this is something that is offered for your mouse model. If it isn’t, you may find that software that isn’t specifically designed for your mouse will work for some features, but this isn’t guaranteed.
Making Changes In Windows 10
Once you know how to change your mouse speed in Windows 10, you can start to look at other tweaks you can make to your settings. You may wish to change your keyboard language to help your language skills improve, or tweak your display settings to improve your Windows 10 display quality.
If you make too many changes, don’t worry, as you can reset and restore Windows to default settings pretty quickly. Be sure to back up your important files before you do this to make sure you don’t lose anything essential, however. If you’re tired of slowdowns, you could always start building a new custom PC to start afresh.


