Windows 10 is currently the most popular computer operating system. This statement is validated by the billion users enjoying it worldwide as it continues to evolve with every update. That said, Windows 10 does come with a host of issues that can make it seem less than reliable at times. Enter Ubuntu Linux.
Ubuntu is a free and open-source distribution that is far more resource-friendly than Windows 10. The majority of creative professionals and programmers prefer to use Ubuntu for its privacy and security, complete customization and personalization capabilities, and its use with cloud computing. When it comes to getting technical work completed, it’s best performed in Ubuntu.
It is not recommended that you install Windows 10 after Ubuntu, but it can be done.
Of course, there are also things that Windows 10 has over Ubuntu, making it more likely to be a PC user’s OS of choice. Simply put, there are quite a few things that Ubuntu can’t do that Windows 10 can.
These primarily revolve around everyday computer activities such as gaming, surfing the web, and other forms of media and entertainment. These things are better left to Windows 10.
This is why it has become commonplace in recent years to have a dual-boot system. Using Ubuntu for technical purposes and Windows 10 for general use is the way of the future.
Contents
Installing Ubuntu On a Windows 10 PC
For those of you with Windows 10 already installed on their PC, installing Ubuntu is a straightforward process. It’s the easier method of the two as Ubuntu is commonly installed “on top” of Windows 10.
Ubuntu Requirements For Windows 10
Back up all of your important data prior to installing Ubuntu. Purchase yourself a USB stick with a minimum of 8GB storage to serve as a boot drive and make sure that your Windows PC meets the following requirements:
- 2 GHz dual-core processor
- 2 GB RAM
- 25 GB of hard-drive space
- VGA capable of 1024×768 screen resolution.
How To Dual Boot Ubuntu With Windows 10
Head over to the Ubuntu website and download the latest version of the Ubuntu ISO file.
Next, it’s time to create a bootable USB stick. Using the USB you purchased, download Rufus from the official website. The program will help you to create a USB stick for Ubuntu as Rufus is UEFI-compatible.
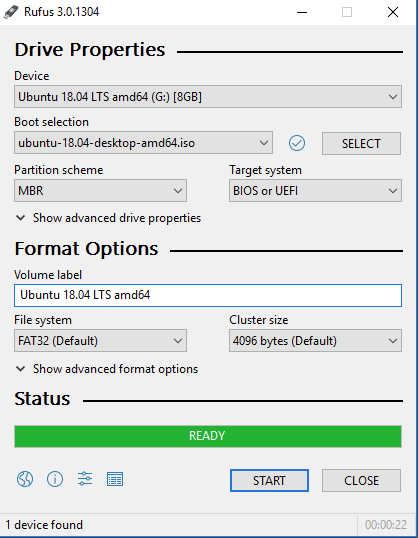
After it’s downloaded, launch Rufus. Locate the create a bootable disk using section and select the ISO image. Find the Ubuntu ISO file you downloaded earlier and select it.
Now you’ll need to create a disk partition for Ubuntu. Right-click the Windows 10 Start Menu and open Disk Management.
Right-click on the drive which you want to partition and select shrink volume. Allocate a minimum of 64GB storage to ensure that Ubuntu functions properly.
Finally, restart your PC and open the Boot Menu or UEFI Firmware settings. Then boot from the USB stick that contains Ubuntu. Select your preferred language from the Ubuntu installation menu. You’ll also need to select Install Ubuntu alongside Windows 10 in order to be able to dual-boot both operating systems.
Once the setup process is complete, restart your computer. Now, whenever you turn on your computer you’ll be asked to boot into either Ubuntu or Windows 10.
Installing Windows 10 Onto An Ubuntu Machine
Installing Windows 10 after Ubuntu can be a tad trickier and is honestly not recommended. However, if this is what you have to work with, there is definitely a procedure you can follow.
Prepare A Partition For Windows 10
Ensure that the intended partition for the Windows operating system is the Primary NTFS partition. You’ll need to create this on Ubuntu, specifically for Windows installation purposes.
You can create a partition by using the gParted or Disk Utility command-line tools. You’ll have to delete any already created logical/extended partitions you may have and create a new primary partition. This will erase all data currently residing in the partition, so back up what is necessary.
Installing Windows 10
You’ll need a USB stick or DVD with Windows 10 preloaded on to it in order to start the Windows installation process. You will also obviously need a functioning Windows Activation Key to authenticate the installation.
Boot up using whichever medium you’ve chosen.
Choose Custom Installation, because you want to get everything right moving forward and choosing this option will help to avoid issues.
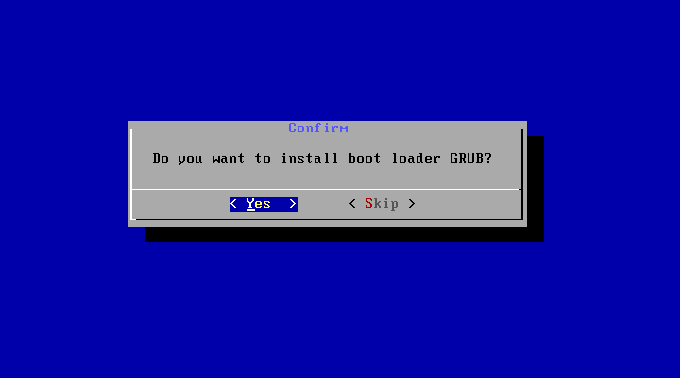
Select the NTFS Primary Partition that you created earlier as your Windows 10 installation partition. GRUB will be replaced by the Windows bootloader once the installation process is complete which means the GRUB menu will no longer be there when you go to boot your machine. However, we can just install GRUB again once you’re ready to do so.
Installing GRUB
Acquire a LiveCD or LiveUSB of Ubuntu and load it up. Open up the Terminal and type in the following:
sudo add-apt-repository ppa:yannubuntu/boot-repair && sudo apt-get update
sudo apt-get install -y boot-repair && boot-repair
Boot-repair will launch automatically after installation has come to an end. Select the recommended repair option, wait until GRUB is fully installed, then reboot your computer.
The GRUB menu will once again be there to greet you. You can now choose which operating system you want to run.


