The “Faulty Hardware Corrupted Page” error is a complicated BSOD (Blue Screen of Death) stop code that indicates memory corruption in Windows 10. Several reasons—such as outdated device drivers, corrupt system files, and faulty hardware—can cause this error to show up.
The following list of troubleshooting tips and fixes should help you sort out the “Faulty Hardware Corrupted Page” BSOD error on your computer.

Note: If the “Faulty Hardware Corrupted Page” BSOD prevents you from accessing the Windows 10 desktop, try booting the operating system in Safe Mode instead.
Contents
- 1 1. Disable Fast Startup
- 2 2. Update Device Drivers
- 3 3. Roll Back Device Drivers
- 4 4. Remove External Peripherals
- 5 5. Run System File Checker & DISM Tool
- 6 6. Run Check Disk Utility
- 7 7. Run Windows Memory Diagnostic Tool
- 8 8. Clean the Computer
- 9 9. Update BIOS or UEFI
- 10 10. Reset Windows 10
- 11 Faulty Hardware Fixed
1. Disable Fast Startup
Windows 10’s Fast Startup feature caches core components such as the system kernel to make your computer boot faster. But it can also end up corrupting the memory. Disabling Fast Startup may resolve the “Faulty Hardware Corrupted Page” BSOD error.
1. Press Windows + X to open the Power User Menu. Then, select Power Options.
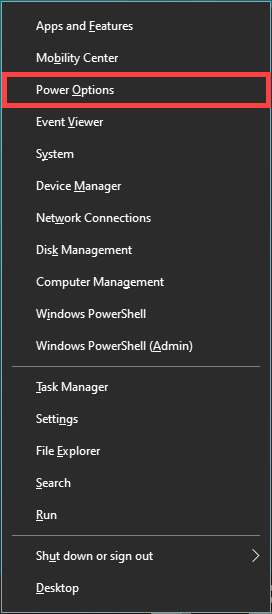
2. Select Additional power settings.
3. Pick the Choose what the power button does option.
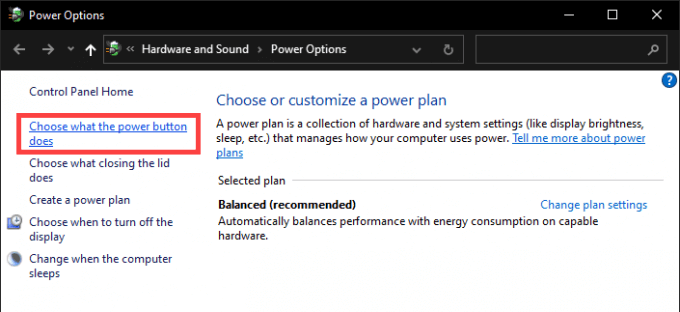
4. Select Change settings that are currently unavailable.
5. Uncheck the box next to Turn on fast startup (recommended).
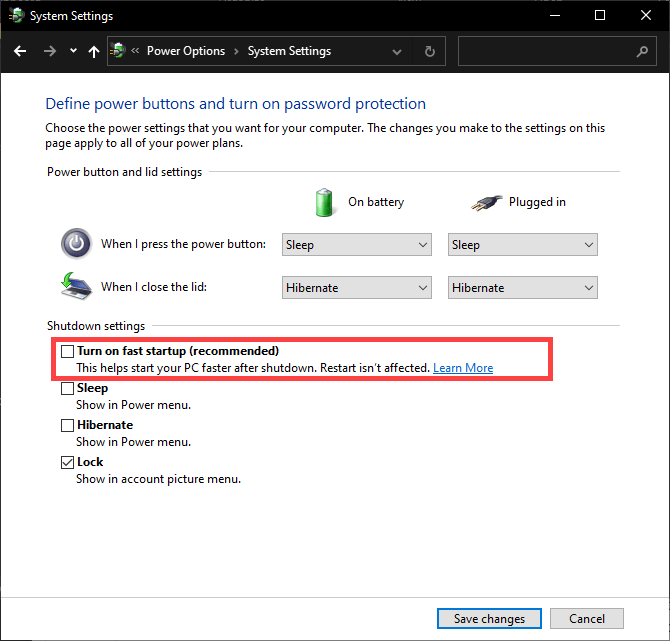
6. Select Save changes.
7. Power down your computer and wait for 30 seconds before booting it back up.
2. Update Device Drivers
Outdated drivers also result in the “Faulty Hardware Corrupted Page” BSOD error due to the various system-related incompatibilities they introduce. Hence, it’s a good idea to update each device driver to its latest version. You should start by applying pending driver updates from Windows Update.
1. Open the Power User Menu and select Settings.
2. Select Update & Security.
3. Select Check for Updates. Wait until Windows Update finishes scanning for new updates.
4. Select View optional updates.
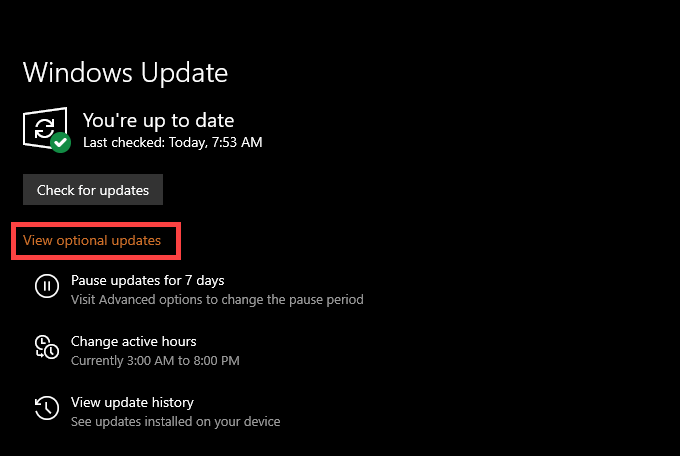
5. Check the boxes next to any available drivers and select Download and install.
Continue by obtaining newer versions of device drivers for components such as the video card, sound card, and motherboard from the relevant hardware manufacturer websites. To speed things up, you should try using a driver updater tool.
3. Roll Back Device Drivers
Rarely, new hardware drivers can conflict with the operating system and cause system issues and errors. Microsoft knows that. If the “Faulty Hardware Corrupted Page” BSOD showed up after a recent device driver update, you have the option to roll it back.
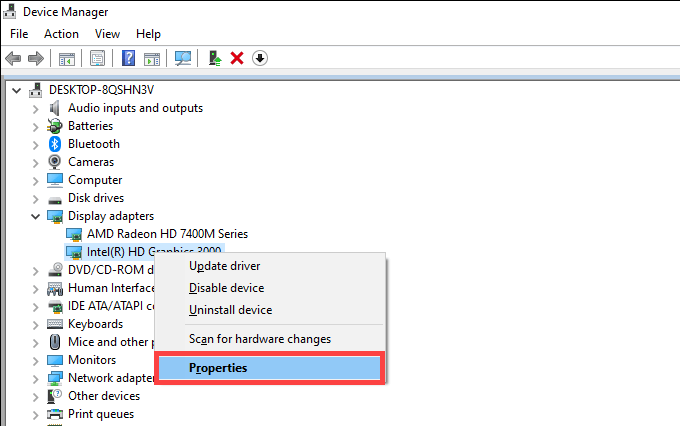
1. Open the Power User Menu and select Device Manager.
2. Expand the device category (such as Display adapters) and right-click the device you want to roll back.
3. Select Properties.
4. Switch to the Driver tab.
5. Select Roll Back Driver.
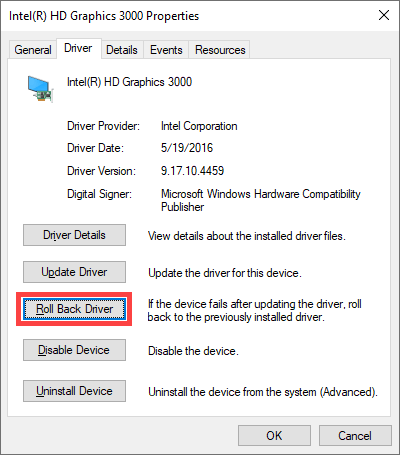
6. Restart your computer.
4. Remove External Peripherals
Do you have multiple external peripherals—such as printers, scanners, and speakers—connected to your computer? Disconnect them (except for any input devices) and reboot Windows 10.
If that ends up fixing the “Faulty Hardware Corrupted Page” BSOD error, try reconnecting each peripheral, one after the other, to identify the problematic device. Follow this by updating or rolling back the drivers for that particular device.
5. Run System File Checker & DISM Tool
Corrupted system files can destabilize Windows 10 and trigger the “Faulty Hardware Corrupted Page” BSOD error. You must attempt to fix them using the System File Checker (SFC) and Deployment Image Servicing and Management (DISM) tool.
1. Open the Power User Menu and select Windows PowerShell (Admin).
2. Type sfc /scannow and press Enter.
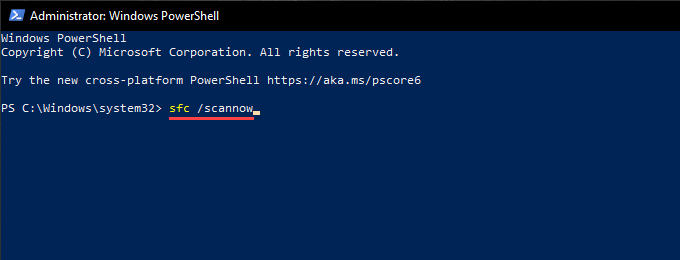
3. If the System File Checker manages to find and repair any system files on your computer, follow by running the DISM tool. To do that, execute the three commands below:
- DISM /Online /Cleanup-Image /CheckHealth
- DISM /Online /Cleanup-Image /ScanHealth
- DISM /Online /Cleanup-Image /RestoreHealth
6. Run Check Disk Utility
The Check Disk Utility (CHKDSK) features the ability to resolve disk errors on your computer. Try running it on the partition that holds Windows 10.
1. Open an elevated Windows PowerShell console.
2. Type chkdsk C: /R (replace C with the drive letter of the Windows 10 partition) and press Enter.
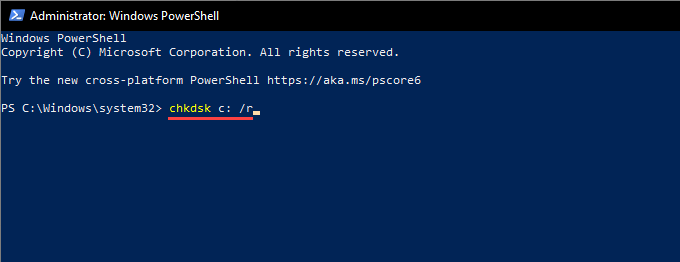
3. Windows PowerShell should prompt you for permission to run the Check Disk Utility during the next system reboot. Type Y and press Enter.
4. Restart your computer.
5. Wait for the Check Disk Utility to finish scanning and repairing drive errors. That can take up to an hour (or even more) to complete.
7. Run Windows Memory Diagnostic Tool
Windows 10’s Windows Memory Diagnostic tool detects issues with the hardware RAM (random access memory) on your computer. It does not fix anything but instead allows you to rule out instances of faulty physical memory.
1. Open Windows Search (press Windows + S). Then, type windows memory diagnostic and select Open.
2. Select Restart now and check for problems (recommended). Your computer should restart automatically and load Windows Memory Diagnostic at startup.
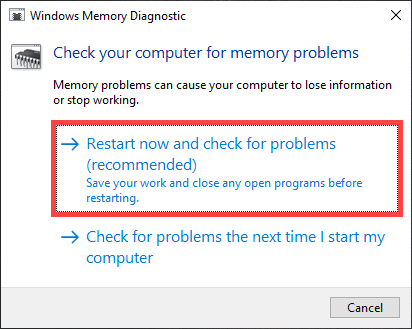
3. Wait until Windows Memory Diagnostic finishes checking for memory-related errors. Your computer should continue loading into Windows 10 after that.
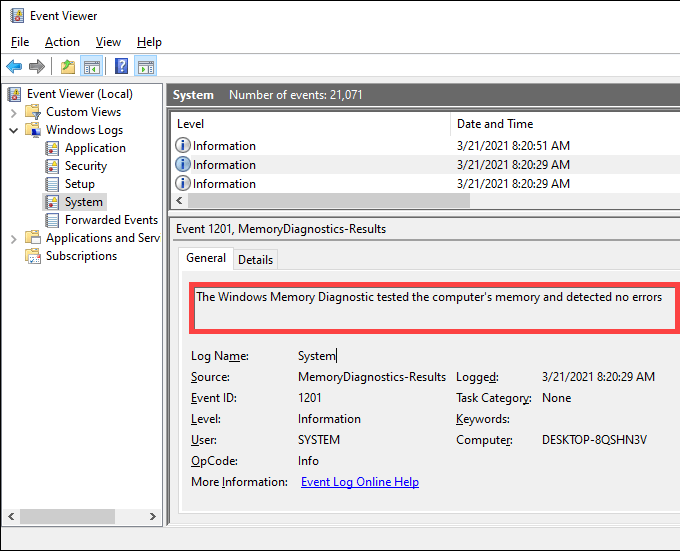
If Windows Memory Diagnostic doesn’t present you with its findings, go through the remaining steps to access the information via Windows 10’s Event Viewer.
4. Open the Power User Menu and select Event Viewer.
5. Expand Windows Logs on the left pane and select System Logs.
6. Bring up the Action menu and select Find. Then, search for memorydiagnostics to locate the results by Windows Memory Diagnostic. If you see any errors, you must replace the RAM in your computer.
You can also use the third-party MemTest86 tool to run additional diagnostics for memory-related errors.
8. Clean the Computer
The internal components of your computer accumulate dust and debris over time, preventing them from working correctly. Removing, cleaning, and reseating items (such as the graphics card and RAM modules) can potentially fix the “Faulty Hardware Corrupted Page” BSOD.
Take the time to clean the insides of your computer to keep it in top working condition.
9. Update BIOS or UEFI
The BIOS (Basic Input/Output System) or UEFI (Unified Extensible Firmware Interface) is the firmware that makes your PC work. However, an outdated BIOS/UEFI can result in hardware-related conflicts and cause the “Faulty Hardware Corrupted Page” BSOD to show up repeatedly.
You must try updating the BIOS/UEFI on your computer, but it’s a procedure that requires extreme care. Learn how to check and update the BIOS or UEFI.
10. Reset Windows 10
Do you still keep experiencing the “Faulty Hardware Corrupted Page” BSOD error? If so, you must reset Windows 10. That should fix any system-related errors that the System File Checker and DISM tool failed to detect.
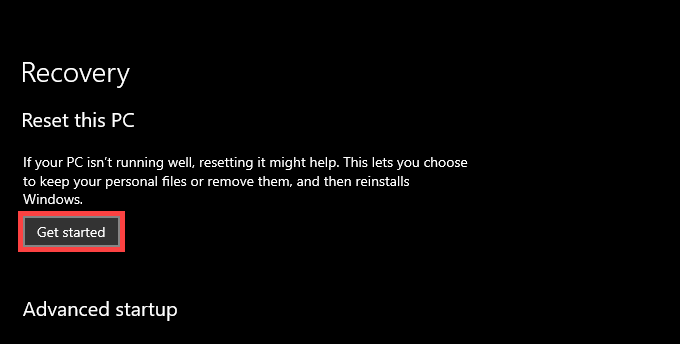
1. Open the Power User Menu and select Settings.
2. Select Update & Security.
3. Switch to the Recovery tab.
4. Select Get started.
5. Choose between the Keep my files and Remove everything options.
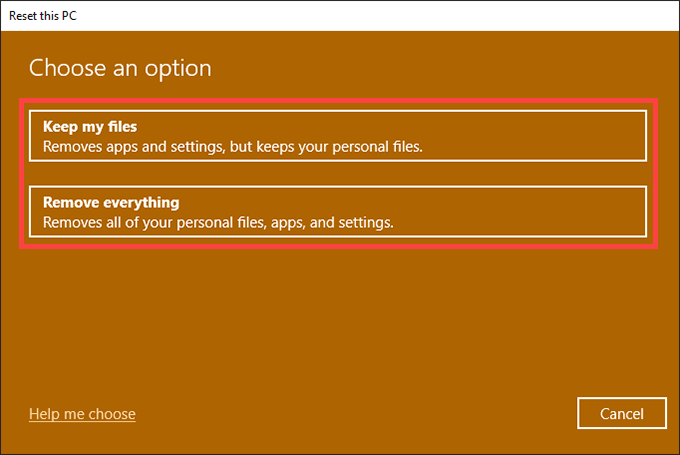
6. Follow the rest of the instructions to reset your PC.
If resetting your PC didn’t fix the issue, you must reinstall Windows 10 from scratch.
Faulty Hardware Fixed
The fixes above should’ve resolved the “Faulty Hardware Corrupted Page” BSOD on your desktop device. But if the Windows Memory Diagnostic tool ended up finding any memory-related faults, consult your local computer technician or PC vendor—regardless of whether the error keeps recurring or not—for a possible RAM replacement or other hardware-related repairs.

