Office 365 Personal, Home or Business products are great ways to access all of Microsoft’s Office products on your desktop, tablet or mobile phone. It’s way better than having to buy each version of Office individually and enter a product key, like we used to have to do before.
With Office 365, you get free updates whenever a new version is released and it’s really easy to move your copy of Office from one computer to another. If you have Home or Business, you can install Office on multiple machines with no issues.
However, by default, Office 365 installs 32-bit versions of Office onto systems. I’m guessing they do this for compatibility purposes. However, most modern computers support 64-bit and have 64-bit operating systems installed, so why install 32-bit software if you can avoid it right?
In this article, I’ll show you how you can install the 64-bit version of Office using Office 365.
Step 1 – Uninstall Current Version of Office
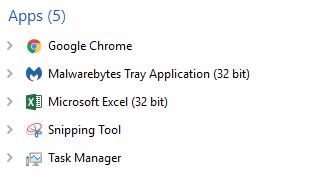
Firstly, how can you tell whether you are running the 32-bit version of Office or not? Well, that’s easy. Just open Task Manager. You can do that by using the CTRL + SHIFT + ESC keyboard shortcut or by right-clicking on the Start button and choosing task manager.

Any program that has the (32 bit) text listed to the right of the program name is a 32-bit application. As you can see, my version of Excel is currently 32-bit. Before we can do that, we have to uninstall the current version of Office. The great thing about Office 365 installs and uninstalls is that they are so much faster than the old days where it would take 30 minutes to install Office.

Click on Start, then click on the Settings icon (gear icon), then click on Apps and then scroll down till you see Microsoft Office 365. Click on that and then click Uninstall.

It shouldn’t take more than a few minutes for Office to uninstall. Once it is done, you need to log into Office 365. If you are using the Personal or Home versions, you can go to stores.office.com. Login using your Microsoft ID and then click on your name at the top and then on My Account.

You’ll then see the Install button at the top left. Here it’ll also tell you how many installs you have currently used out of the total.

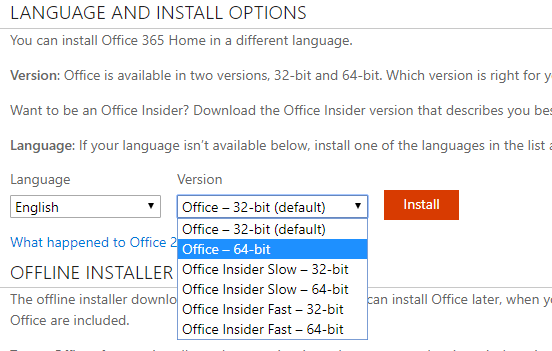
Now this step is the important one. Don’t like on the big Install button at the right! Instead, you need to click on Language, 32/64-bit, and other install options.

On the next screen, you’ll be able to pick the version of Office you want to install. I normally just pick Office – 64-bit. You can also choose from Office Insider, which basically lets you get the absolute latest versions before everyone else. However, those versions can have more bugs too. Slow is usually more stable than Fast.

That’s about it. Now it should install Office and you should be good to go with the 64-bit version.

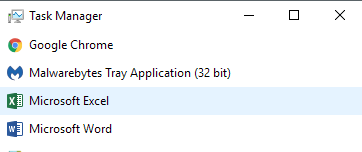
Lastly, you can check by going back to task manager and noticing that the 32-bit is now gone from the program name.

In my opinion, 64-bit software runs better on 64-bit hardware. You should have less crashes and less problems overall. Enjoy!


