Batch files are a great way to run tasks on your PC automatically. If you’d like to schedule a batch file to run automatically, use your Windows 10 or Windows 11 PC’s Task Scheduler utility.
Task Scheduler lets you trigger your batch file to run at a specific time or when a specified event occurs. You also get loads of configurable options to define how the file runs. We assume you already have the batch file created, so in this article, we’ll show you how to schedule that batch file to run.

Why Schedule Batch Files on Your Windows PC
There are countless reasons to schedule a batch file on your PC. One good example is creating a batch file that clears your Downloads folder. For example, you can run this batch script to remove your Downloads every week.
Similarly, you can make a script that automatically launches your favorite programs when you turn on your computer. When it comes to automating tasks with batch files, your creativity is the only limit.
Schedule Batch Files With Windows Task Scheduler
Place your bat file in an appropriate location on your PC. If you move the file after creating the task, the task will stop working, so place it somewhere you’d like it to stay. Start the process by opening your Microsoft Windows PC’s Start menu, searching for Task Scheduler, and selecting that tool in the search results.

Select Action > Create Basic Task on the Task Scheduler’s window. You’ll use this task to run your batch file.

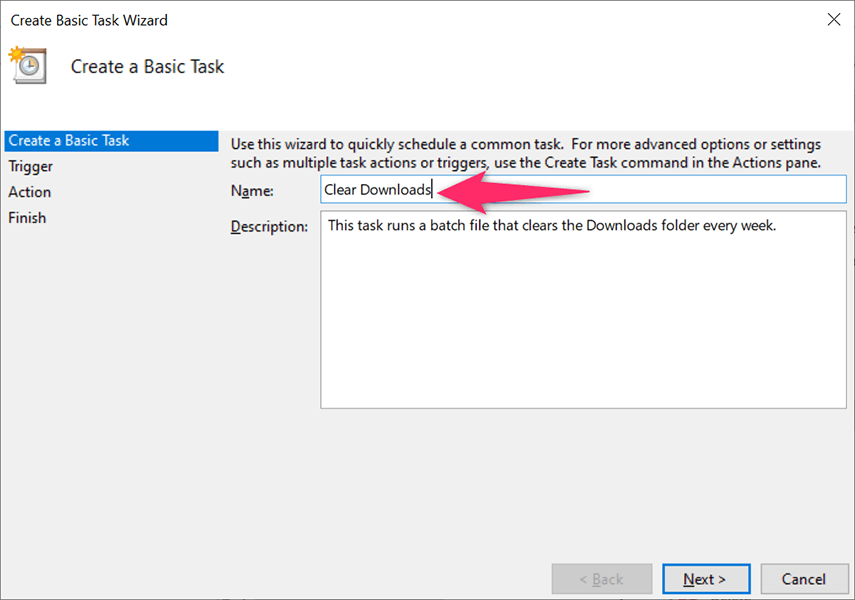
Select the Name field and type a name for your task. The name could be anything that helps you recognize your task. Then, optionally, enter a description for the task and select Next at the bottom.
You’ll choose when and how often your batch file runs in the following window. The options that you can choose from are:
- Daily: Run your batch file every day.
- Weekly: Execute your file on a particular day each week.
- Monthly: Run your batch file on a particular day each month.
- One time: Only run the batch file once.
- When the computer starts: Launch your batch file when your PC turns on. Note that this task will run when the computer starts, but before logging on.
- When I log on: Run your batch file when you log in to your account on your PC.
- When a specific event is logged: This is for advanced users. If you want to run your batch file when a particular event takes place on your PC, choose this option.
In most cases, you’ll choose one of the first four options. Once you’ve made a selection, click Next at the bottom.
We’ll choose the Weekly option for the demonstration.

You’ll choose when to run your batch file on the window that opens. Depending on what you selected in the previous step, you’ll see appropriate options.
Since we chose Weekly in the previous step, we’ll select the start date and time on this window. Then, we’ll click the Recur every box and pick when the task reoccurs, and then choose the day of the week.
Finally, we’ll select Next at the bottom.

Task Scheduler will now ask what you’d like to run at the specified time. Choose Start a program since you want to run a batch file. Then, select Next at the bottom.

Click the Browse button on the following screen and choose the batch file to run. Optionally, add arguments and a start in time. Then, select Next at the bottom.

You’ll see your newly created task’s summary on your screen. Click the Finish button if this summary looks good to you.
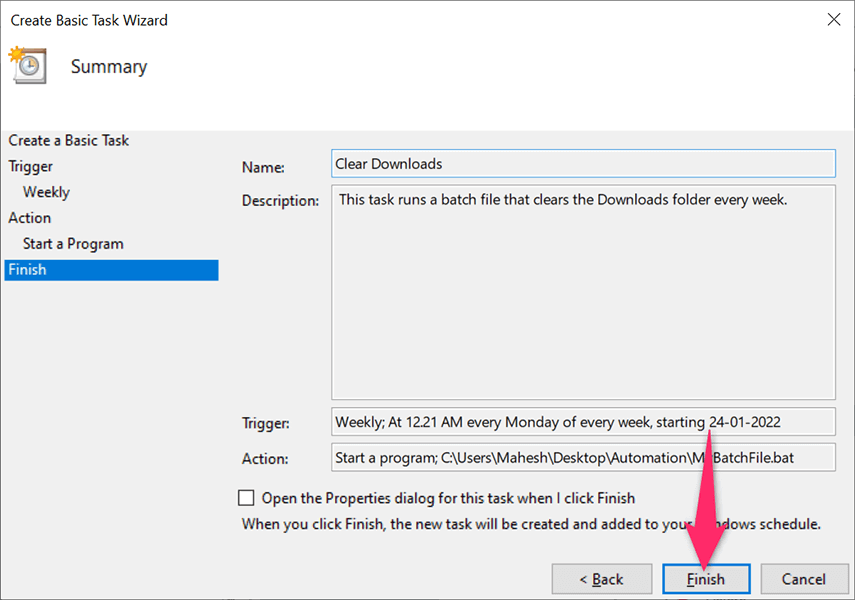
Task Scheduler has saved your task, and your task will run at the specified date and time.
Edit or Delete a Batch File Task in Task Scheduler on Windows
Task Scheduler allows you to edit your task even after creation. This way, you can change what, when, and how often the batch file runs. You can also delete the task if you no longer want to run your file.
Start the Task Scheduler utility on your Windows 10 or Windows 11 PC and select the Task Scheduler Library on the left. In the middle pane, right-click your task and choose Properties from the menu to edit the task.

Use the various tabs on the Properties window to change your task’s options. For example, select the Triggers tab if you’d like to change the schedule for your batch file. You can then choose the current schedule, click Edit, and then specify the new schedule for your file.

Similarly, open the Actions tab to change what batch file runs when your task is launched. Again, select your current batch file, click Edit, and then select the new file if you want.

Lastly, you can get rid of your task so that your batch file doesn’t automatically run. You can do this by right-clicking your task on Task Scheduler’s main window and choosing Delete from the menu.

Choose Yes in the prompt to delete your task. You can always create a new task to run the same or a different file at scheduled intervals.
Keep in mind that your PC must be on for Task Scheduler to run your task. Your batch file won’t run if your PC is off when the scheduled time comes.

