Audio issues on Windows can result from a hardware-related issue like a damaged sound card or a software-related issue like a corrupt driver. Microsoft frequently rolls out updates to fix a lot of the software-related issues, but you can also troubleshoot those issues yourself. If you’re on Windows 10 or 11, and facing audio issues, this guide will help you find a fix.
Before you start troubleshooting, try restarting your PC. In some cases, a reboot will fix your problem without having to tinker with any settings on your Windows PC. For instance, a Windows update may have put the audio drivers on standby until you reboot. If a reboot doesn’t work, try the following fixes.
Contents
Check Cables or Wireless Connections
Before changing settings on your Windows PC, double-check if the audio cables are inserted properly into the PC. It’s best to disconnect and reconnect all devices to make sure there are no loose connections. While you’re at it, also check your cable for physical damage. If the cable is damaged, you may need to replace it.
If you’re using a Bluetooth headset, external speakers, or another wireless sound device, you’ll want to check that it’s properly connected to the PC. Press Win + I and select Bluetooth & devices.
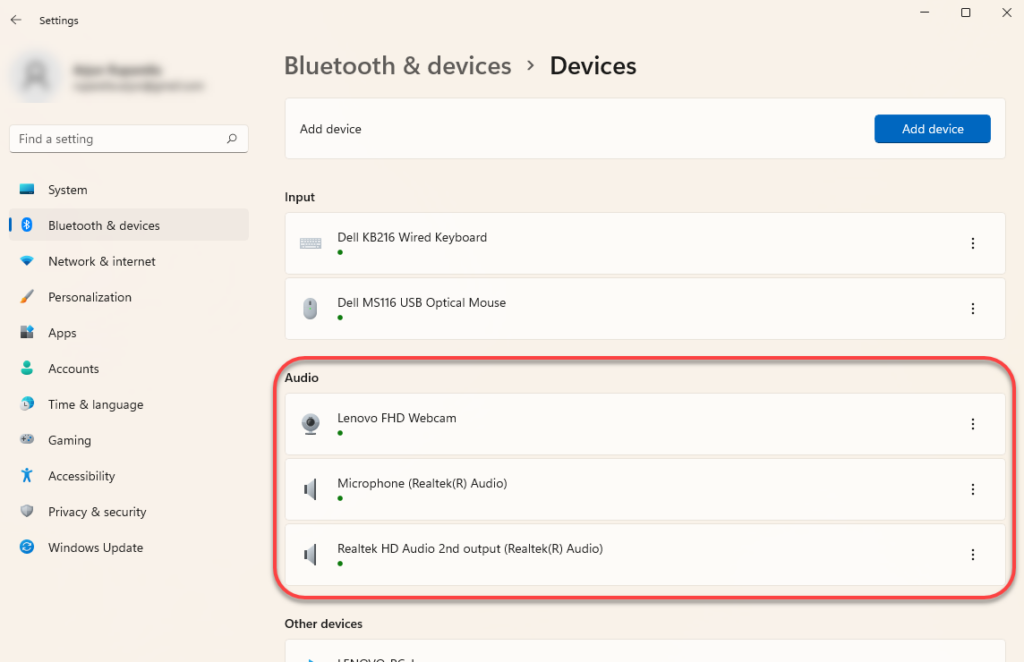
Check if your device is paired properly with your PC. If in doubt, just remove the device and pair it again. You can remove the device by selecting the vertical ellipsis at the right of a device and selecting Remove device.

Then pair your audio device again and see if that fixes the sound problem.
Check the Volume Mixer
Windows allows you to adjust volume app-wise. Even though the sound icon in your taskbar may not show the mute symbol, you could’ve still knowingly or unknowingly changed the volume for a particular app.
You can check a particular app’s audio playback level from the volume mixer. To open the volume mixer, right-click on the speaker icon at the right end of the taskbar and select Open Volume Mixer.

Doing this will take you to the Settings app. You’ll be able to adjust the volume for all apps from the Apps section.
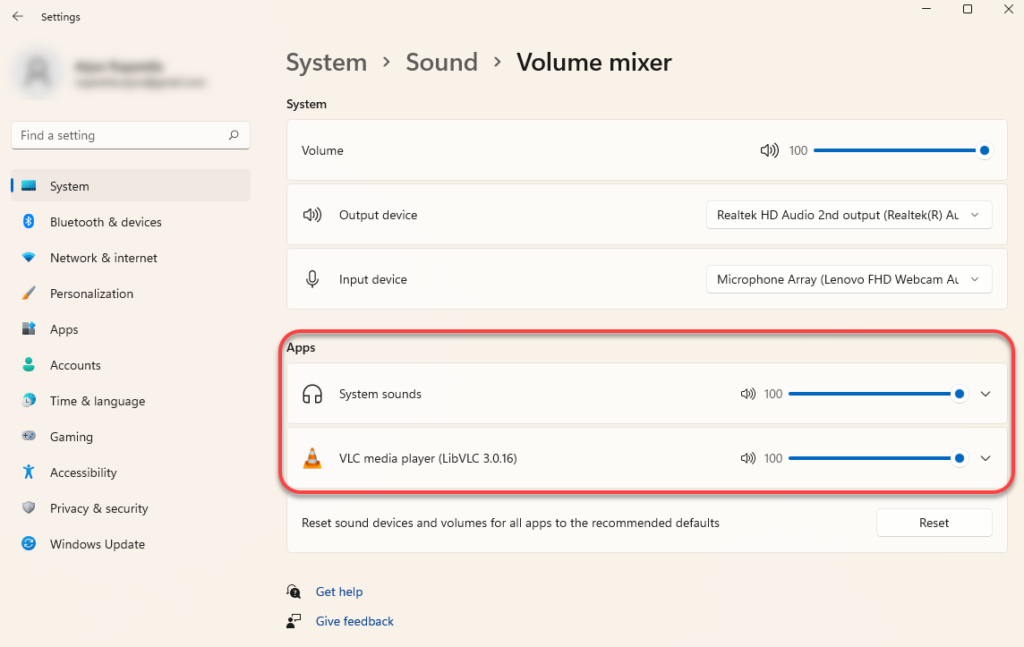
If the volume for any of those apps is closer to 0, unmute it. Bring it up to 100 just to test it and see if that fixes the sound problem.
Check the Active Output Device
If you’ve connected more than one audio device to your PC, it may be playing the sound on a different device than the one you’re using. This may be particularly true if you’ve connected the audio device using a USB or HDMI cable because you’ll need to set those devices as default yourself.
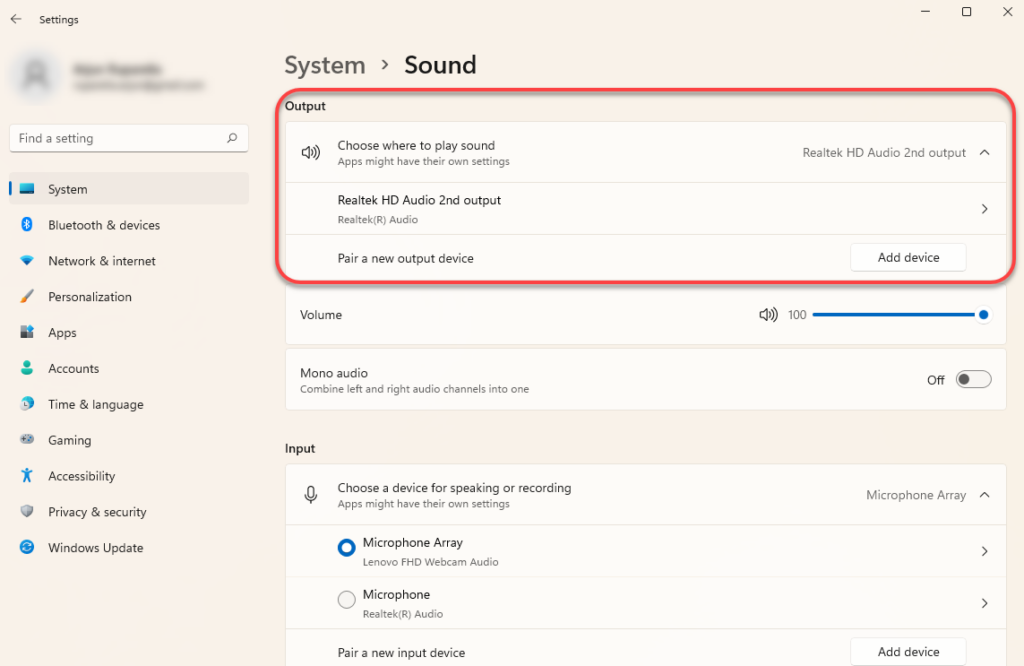
You can change the audio device from the sound settings. To open sound settings, right-click on the speaker icon at the right end of the taskbar and select Sound settings.
At the top of the window, you’ll see an option to Choose where to play sound. Select the appropriate default audio device and check if that fixes the audio problems on your PC. However, you can also play sound on multiple devices at the same time.
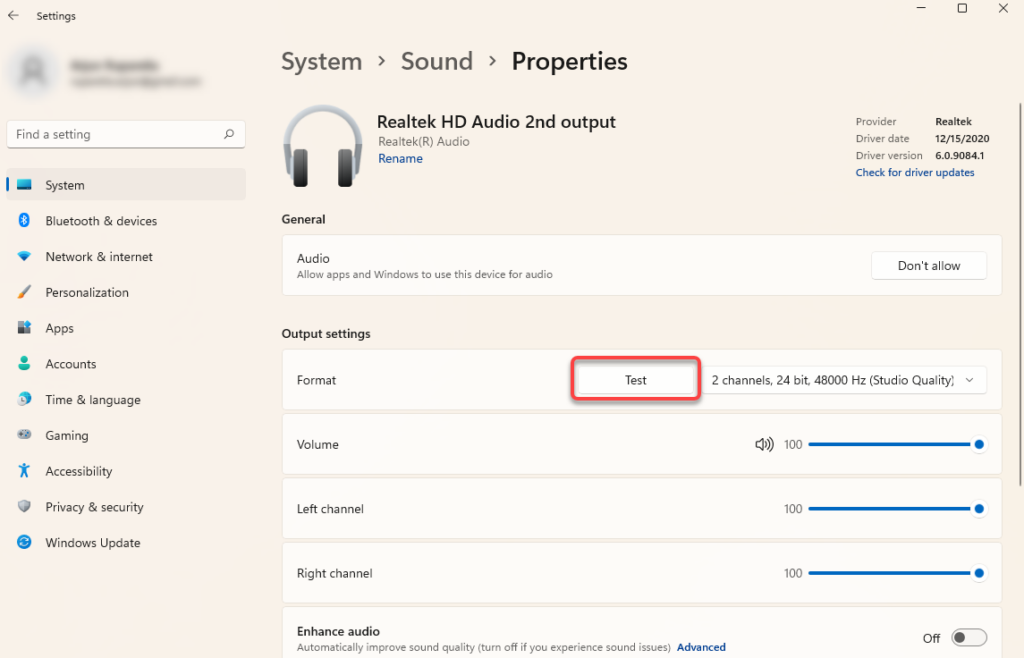
You can also test the audio when you set the default device by selecting the relevant audio device and selecting the Test button on the next screen.
Alternatively, you can also choose a different playback device by going to Control Panel > Hardware and Sound > Sound. Switch to the Playback tab, select a device, and select the Set Default button from the bottom.

Use the Built-In Audio Troubleshooter
Windows has several built-in troubleshooters, including an audio troubleshooter that can determine and fix the problem automatically. The built-in troubleshooters aren’t always effective, but it’s a good option to try before you try more intrusive fixes.
You’ll find the built-in troubleshooter in the Settings app. Press Win + I to launch the Settings app and navigate to System > Troubleshoot > Other troubleshooters. Search the list of troubleshooters for an item called Playing Audio and select the Run button next to it.
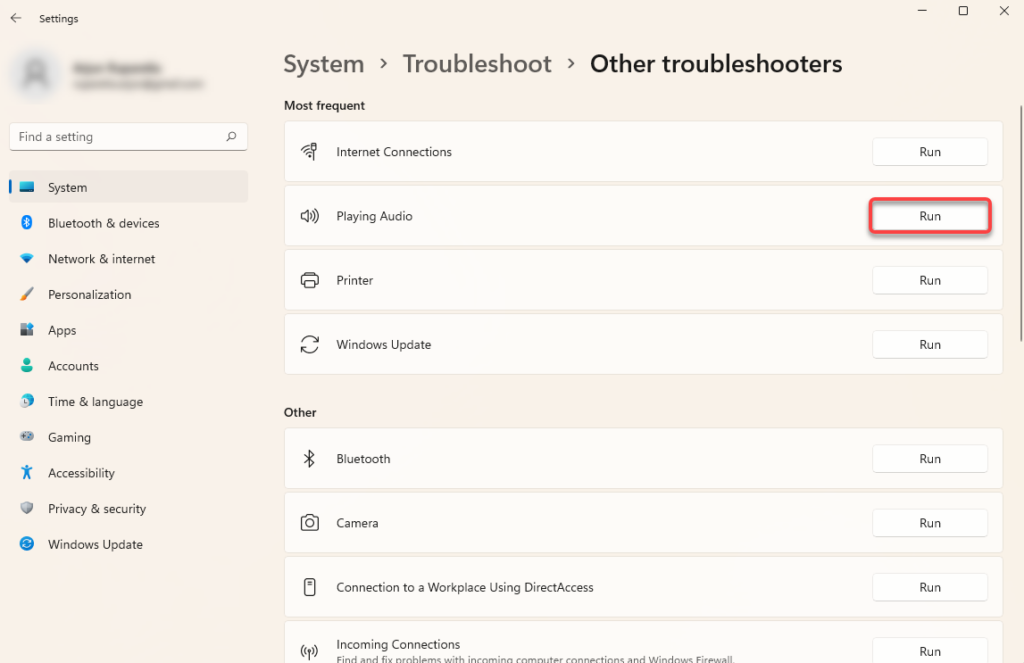
Follow the on-screen instructions and let Windows attempt to find and fix issues.
Update, Reinstall, or Roll Back Audio Drivers
If your sound drivers have become outdated, corrupt, or been removed, you might not be able to get any audio output. You can fix audio problems caused by a driver by simply updating or reinstalling them. Even without an audio problem, it’s best to update drivers every once in a while.
To update or reinstall a driver, you’ll need to use the Device Manager. Press Win + R, type devmgmt.msc, and press Enter to launch the Device Manager. Search for a category called Sound, video, and game controllers and select the tiny arrow to its left to expand the list.
Find the driver for the relevant device, right-click on it, and select Uninstall device.
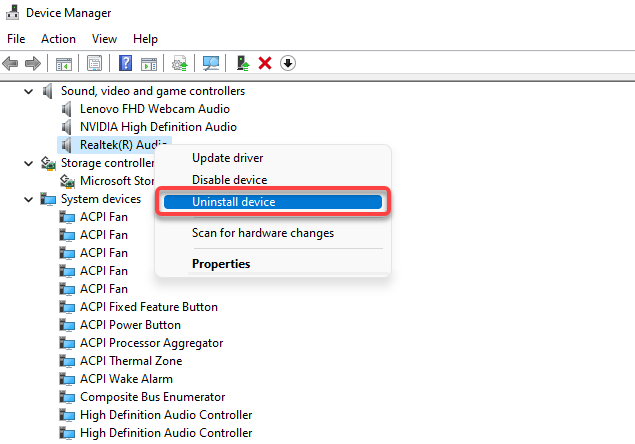
In many cases, you’ll see a Realtek audio driver, but other devices may be listed separately. You can uninstall all devices one by one and then select Action from the ribbon at the top, and select Scan for hardware changes.
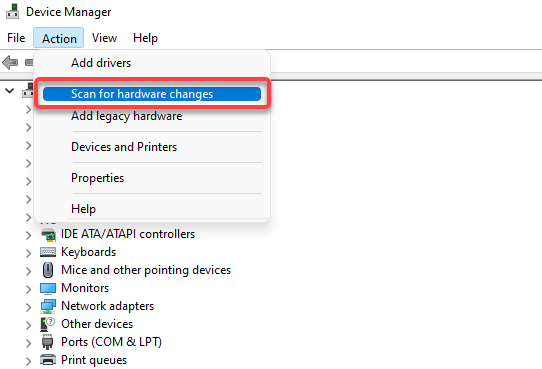
Doing this will reinstall the new drivers for all devices that you uninstalled. Alternatively, if you’ve downloaded the drivers from the manufacturer’s website, right-click on the device and select Update driver.
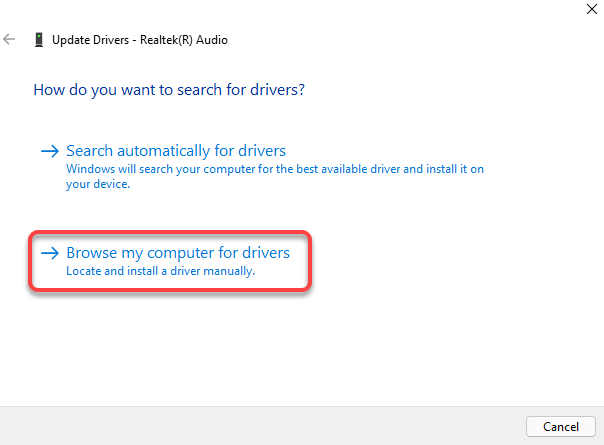
Select Browse my computer for drivers and select the driver files from your PC.
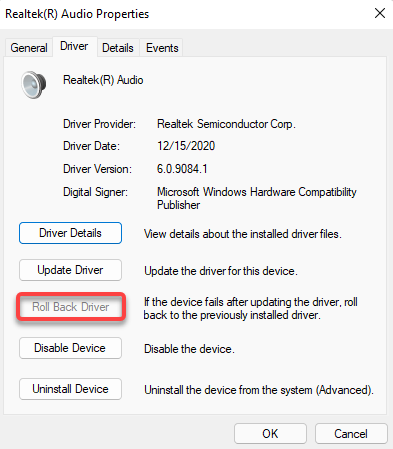
In some cases, though, a driver update may be faulty. If your playback device was working fine until you updated the device driver, you can roll back the driver and use the previously installed device driver. Note that you’ll have this option only if the driver has been updated at least once and Windows still has the older driver that it can roll back to.
To roll back drivers, right-click on the device, select Properties, switch to the Driver tab, and select Roll Back Driver.
Disable Windows Audio Enhancements
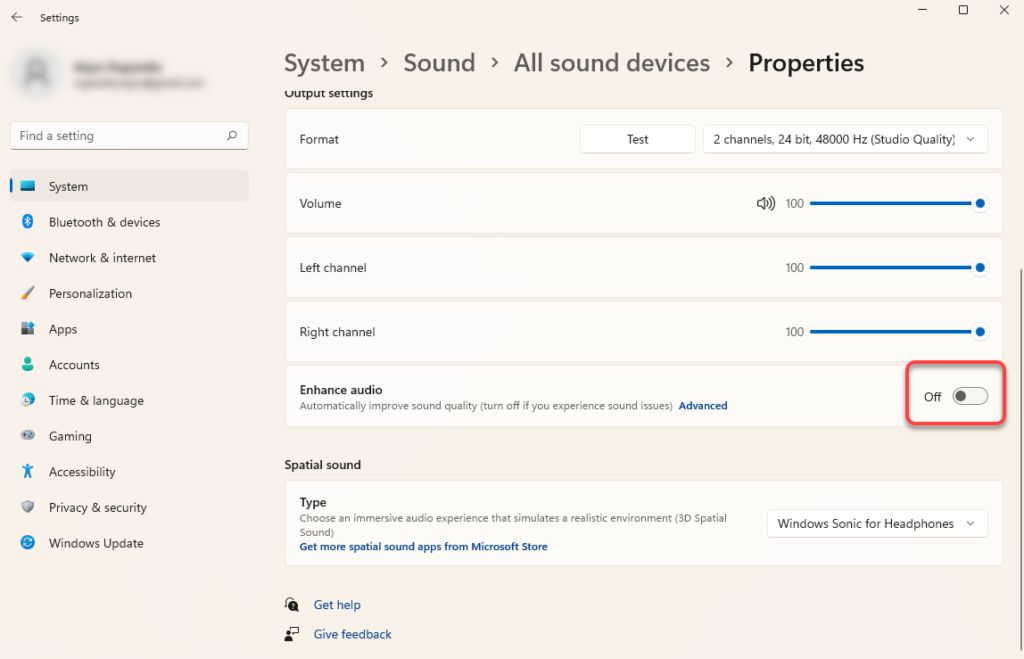
Windows Audio Enhancements is a built-in feature that can improve the audio quality on Windows PCs. However, they can also cause sound issues on some PCs. Usually, the fix is to simply disable enhancements.
You can disable enhancements from within the Settings app. Press Win + I to launch the Settings app and navigate to System > Sound > All sound devices. Select the relevant audio device and turn the button next to Enhance audio off. Doing this will disable all enhancements.
Restart the Windows Audio Service
If you’re still trying to fix sound on your Windows 11 or 10, it may be worthwhile to restart the Windows Audio and Windows Audio Endpoint Builder services. The services may also have automatically disabled itself in some cases, leaving you with no sound.
Press Win + R, type services.msc, and press Enter to launch the Services console. Search the list for a service called Windows Audio. You can do this by pressing Ctrl + F, typing windows audio in the search box, and pressing Enter.
Double-click on the service once you find it. If the Service status appears as Stopped, just select the Start button.
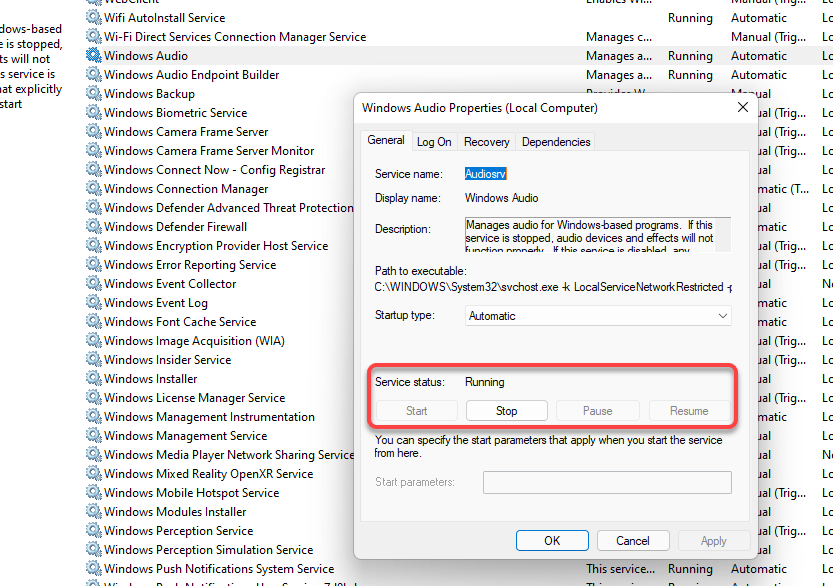
If the service is already running, select the Stop button and then the Start button to restart it.
Also, check the Startup type. If it’s set to anything but Automatic, change it to Automatic. Once you’re done, select OK. Repeat the same process for the Windows Audio Endpoint Builder service.
Windows Audio Problems Fixed
Hopefully, one of these fixes worked for you and the audio works fine on your PC. However, if it doesn’t, you may want to consider a System Restore. If you’re having a bunch of other issues as well, resetting Windows might be another viable option. Just be sure to backup your PC before using either of those options.

